Loading...
Loading...
Loading...
Loading...
Loading...
Loading...
Loading...
Loading...
Loading...
Loading...
Loading...
Loading...
Loading...
Loading...
Loading...
Loading...
Loading...
Loading...
Loading...
Loading...
Loading...
Loading...
Loading...
Loading...
Loading...
Loading...
Loading...
Loading...
Loading...
Loading...
Loading...
Loading...
Loading...
Loading...
Loading...
Loading...
Loading...
Loading...
Loading...
Loading...
Loading...
Loading...
Loading...
Loading...
Loading...
Loading...
Loading...
Loading...
Loading...
Loading...
Loading...
Loading...
Loading...
Loading...
Loading...
Loading...
Loading...
Loading...
Loading...
Loading...
Loading...
Loading...
Loading...
Loading...
Loading...
Loading...
Loading...
Loading...
Loading...
Loading...
Loading...
Loading...
Loading...
Loading...
Loading...
Loading...
Loading...
Loading...
Loading...
Loading...
Loading...
Loading...
Loading...
Loading...
Loading...
Loading...
Loading...
Loading...
Loading...
Loading...
Loading...
Loading...
Loading...
Loading...
Loading...
Loading...
Loading...
Loading...
Loading...
The Visual Experience Platform is your environment that hosts all modules you use with Scaleflex.
In this section, you will learn about the basics of the VXP, which include: - Your VXP token - Account and Project settings options
The Account section within Settings consist of two parts: Profile and Support. Use these pages to understand how to set up your account and use Support.
Continue to the next page to learn about setting up your Profile.
Enable standard dashboards to control usage and assets delivery.
Welcome to the VXP Documentation! This guide is designed to help you get started with The Visual Experience Platform and make the most out of its modules and features.
The VXP is a platform to support the creation, management, optimization and delivery of visual experiences relying on visual assets, such as images, videos and documents.
It brings together 4 modules into 1 scalable and flexible platform for digital teams and IT teams to use via a web console (VXP Hub) or an API (headless):
: manage a library of visual assets in one single source-of-truth for both digital teams and developers.
: automate manual content workflows with AI-powered enrichment, moderation, and generative AI to streamline processes.
: publish design guidelines and galleries to multiple stakeholders using a no-code portal builder.
: optimize images and videos with smart transformations and accelerate delivery over multi-CDN.
The platform follows and is built in a composable way to simplify the integration into an existing stack of solutions, such as your PIM, CMS or e-commerce platform.
Start using the to upload your first files, such as images and videos, via simple drag and drop, CSV import or API upload. Streamline team collaboration around marketing and product assets.
Enrich files with tags as well as to turn them into assets and organise them into static or dynamic . Leverage to automatically tag, describe and categorize assets.
Publish media galleries on responsive and multi-lingual , built via our easy-to-use and templated no-code CMS.
Dynamically generate of assets to ensure optimal size and crop for each specific channel. Leverage the DAM Studio to create marketing banners at scale with dynamic images and text.
Speed up delivery by utilizing modern compression formats such as WebP, AVIF, and WebM, alongside Content Delivery Networks (CDNs), to enhance web page performance and improve core web vitals.
Finally, get access to and insights about the platform's user adoption, insights about your asset's performance and help drive decision on which asset to use and where.
Modules: DAM, Visual AI, DMO Target users: developers and e-commerce team
Modules: DAM Target users: studio team, marketers
Modules: DAM, Portals Target users: branding team
Modules: DAM, Portals Target users: branding team
If you need further assistance, please check our or contact our Customer Experience team at [email protected]
The settings within the VXP platform are your control centre; use this section to understand how to set up your account, manage users or billing, and apply brand identity to your platform.
Within this section, you will learn about the following sections found within the Settings menu: - - -
The Organisation section with Settings is where you can set the general details, view billing, and manage users and teams.
You can jump to the following sections to learn more.
Manage your billing information and plan and view your invoices within the Billing section of the VXP platform.
The Billing page within Settings consists of three sections:
The Plan page provides an overview of your current plan which details what is included and the add-on features that you can purchase.
The Project section under Settings is where you will find the options to include brand identity, view your subscription, and apply analytics, and manage your access.
You can jump to the following sections to learn more.
This section summarizes the Subscription page seen in the Settings bar.
The Subscription page lets you view and manage your current Scaleflex DAM subscription.
In addition, you can view additional optional modules and services that Scaleflex provides.
Visual Operations Credits Usage


You will find the "access" page by going to Settings > Project > Access (page). From here, you will be able to manage access to your project, through API keys, custom security templates or OAuth2.
Coming before end of 2025!
You will find the settings page by clicking on the "Settings" (cog·wheel) icon located at the top right corner of the header, next to your user profile icon.
Scaleflex DAM allows you to group users in teams for easier role and permission management.
The settings for Team management are located at Settings > Organisation > Teams.
Users with Manager, Admin and Owner User roles have access to them.
To create a new team, you can use the + Add Team button.
Give your team a meaningful name, choose the project(token) where it should apply, add a description, and upload an avatar.
After a Team is created, you can find it in the list of existing teams. Click the ... icon at the most-right part of the screen and choose "Manage".
Now, you can add team members from the list of existing users in the selected project. If the user hasn’t been invited to the project, or their invitation is pending, they cannot be added to a team.
You can select and delete team members, which removes them from the Team, but their account will remain active in the project.
If you select option "Edit" from the ... menu, you can rename the Team, modify its Avatar and Description.
Choosing option "Delete" from the ... menu allows you to delete a team. The users who were part of this team will remain active in the current project.
Use descriptive team names to reflect their purpose.
Regularly review team memberships to keep them current and relevant.
Before deleting a team, review its access or tasks to avoid workflow disruptions.
DAM Workflows Monitoring
DAM User Can request Custom Dashboard
Purpose:
The Custom Dashboard Creation page allows users to enable custom dashboards to gain insights about their assets. The interface offers input fields for creating a new dashboard, which includes providing specific identifiers and a quick seal.
Features
Add Dashboard Button: Users can add a new dashboard by clicking the "+ Add dashboard" button, which reveals input fields for configuration.
Dashboard Input Fields: Users must complete four key fields to create a dashboard successfully:
Dashboard Name: The display name of the dashboard.
OAuth2 allows external websites or applications to access resources hosted by Hub on behalf of a user.
OAuth2 authentication is a more secure and complex authentication method that allows users to grant limited access to their resources without exposing their credentials.
View and manage your asset through the Asset Details window.
The Asset Details window allows you to peruse and edit all the information pertaining to the asset, modify the media (if it's in a supported format), publish the asset and more.
All the information about the asset is organised in vertical tabs:
All the available actions are at the top:
You can perform the following actions from the Asset Details window:
The provided token is a key concept to understand when working with Scaleflex DAM. Your token identifies as your tenant, which is used for and known as a project.
Each new Scaleflex DAM account comes with a token for a project. Each token combines a storage container to store assets and a CDN distribution to deliver optimized assets over CDN worldwide. An account can have multiple tokens to suit different projects within an organisation, which is called multi-tenancy.
Whether you use one or multiple tokens for your projects, Scaleflex DAM's multi-tenancy allows you to manage all use cases across various tokens or projects through a unified interface.
Users can be created at the company level or project level.
A hierarchy can be created within each token or project, and users and teams can be given access permissions to single or multiple tokens.
Company-level: grants access to all projects
Project-level: grants access to a project or selected projects, but not all within the company
The invoice page shows all your paid and pending invoices. You can download them for your records and future reference.
Leverage the Scaleflex Media Editors to edit images, videos and more directly in the browser
In Scaleflex DAM you can manipulate your media files to get them just right for your needs.
Browse the relevant media subpage to learn more:
Regional settings allow you to view the asset information for a particular region / locale - whether it be language, currency or anything else that is configured in the Metadata settings.
If Metadata Variants are configured for your project, you can view the asset according to a selected locale - including language, currency or anything else that is configured.
View the history of actions and changes performed onto an asset.
The History tab within the Asset Window will display the whole history of the asset since its inception.
You can view all its versions along their creation timestamps, and you can click to expand any version to see all actions have been done to it, by whom and when:
Save assets to My favorites for quick access later.
Click the heart icon in the top menu of the asset window to add an asset to your personal My Favorites list.
All available asset details are organised in different categories, grouped in tabs:
Third-party asset sharing
Sharebox allows you to share assets with third parties without access to Scaleflex DAM.
To create a Sharebox, select the assets you would like to share and open the Share Assets modal in the top bar or the context menu—Share / Via Sharebox.
Each Sharebox can optionally be password-protected, have an activation and expiration date, and provide options to disable or enable asset downloads. Additionally, you can invite users by email to access the Sharebox.
You can view, modify, or delete Sharebox instances from the left menu in your library under "Sharebox." You can also change the password, activation date, or expiration date.
Variations are dynamically generated transformations of an origin asset
Open the asset management window and navigate to the Variations tab.
Click the + Add variation button to create a new variation using the Image Editor.
After saving the variation, it will appear in the Variations tab. You can hover over the variation to either download it or copy an optimized CDN link for easy sharing.
Control panel where users can manage profile information, login and security settings
Use the share menu from the Asset Window as a quick way to share assets.
You can Publish or Unpublish your asset from this menu and manage its visibility.
In addition, this menu provides options to share your asset through, a CDN link, or embed in website.
This documentation section is dedicated exclusively to Scaleflex DAM. You can access the DAM directly from the top left menu in your VXP hub, to the right of the "home" tab, you will see the "DAM" tab. Once you've clicked on it, you will find yourself within Scaleflex's Digital Asset Management portal.
We offer a list of Scaleflex's DAM most popular plugins with brief descriptions on how to set them up.
You will in general need at least 2 information fr the basic setup of a plugin:
Your "TOKEN" (aka Project identifier), located there:
Your "SEC_TEMPLATE" (Security template), located there:
The Help section located at the end of the top-right menu provides information to users that need further assistance in operating the DAM.
When clicking the Help box in the menu, an additional menu appears:
The DAM Adobe CC embeds the Media Asset Widget (MAW) plugin inside the following supported Adobe applications:
Adobe Photoshop
Adobe Illustrator
Adobe InDesign
There are no more copy-pasting media assets from your local drive to DAM; everything happens within your Creative Cloud application.
Use the Support page to log a bug or make inquiry directly to the Scaleflex CX team.
The Support window will display your logged ticket history to the Customer Experience team. The following information will be displayed:
DAM Canva
The Canva plugin allows you to create using all the power of Canva and any existing templates and designs you have saved, transporting your final render into your DAM library.
Follow the below steps:
Click the Upload button (1), and select the Canva option (2)
Comments with annotations
Image annotations allow you to communicate with fellow contributors and discuss the features of the assets. Comments and annotations are timestamped and are available to all users with editing privileges.
The comment section is accessible from the context menu and the assets management modal of each file.
In the comments section, you can:
The Library settings are accessible for users with Developer, Manager, Administrator or Owner . Their purpose is to control the DAM's Library interface and to personalize the user experience.
The tab contains settings that control the visibility of additional pages in the Library. They help to customize the layout of the Library to fit your workflow. The Homepage can be used as a customizable landing page and the Product view is an additional way to organize your assets for easier management.
The tab contains settings designed to enrich and enhance the user experience. You can choose the order of the Views in the Library (Assets, Folders, Collections, Labels, Products), the Advanced Search options and the asset details which are visible in the Search results.
Filter
Description
Date range
Values: Date ranges with format DD/MM/YYYY Default value: Last 30 days
Purpose: specify the time frame of the viewed stats
Graph name
Description
Current storage used
It shows the Current storage consumed per token
Current number of assets
It shows the Current assets stored per token
Current number of folders
It shows the Current number of folders per token
Evolution of storage per period
It shows storage evolution per day for the selected time frame and tokens.
Evolution of folders & assets count per period
It shows folders and assets count evolution per day for the selected time frame and tokens.
Number of files per directory
It shows Number of assets per folder, for the selected time frame and tokens.
Filter
Description
Date range
Values: Date ranges with format DD/MM/YYYY Default value: Last 30 days
Purpose: specify the time frame of the viewed stats
Graph name
Description
Daily Request Count
This graph shows you the total requests per day aggregated by cache type (HIT/MISS) in the specified period
HIT/MISS over period
This graph shows total requests aggregated by cache type (HIT/MISS) in the specified period
Daily CDN Traffic
This graph shows you the total traffic per day in the specified period
Daily Traffic average / period
This graph shows you the average traffic in the specified period
Daily Traffic peak / period
This graph shows you the peak traffic in the specified period
Total Traffic / period
This graph shows you the total traffic in the specified period
Filter
Description
Date range
Values: Date ranges with format DD/MM/YYYY Default value: Last 30 days
Purpose: specify the time frame of the viewed stats
Graph name
Description
Events per status
It shows the number of events per status aggregated by time per token for the selected time frame
Events per assets
It shows the number of events that have occurred per asset, providing insights into the workload associated with individual assets per token for the selected time frame
Event throughput per day
It shows the throughput of events per day, offering information on the overall efficiency and capacity of the workflow system per token for the selected time frame
Active tasks
It shows the status of active tasks within the workflow system, allowing for real-time monitoring and identification of potential bottlenecks per token for the selected time frame
Events history
It shows access to the log history of events, enabling detailed troubleshooting and analysis of workflow behavior.
OAuth 2 login URL
Read only input field which providing a link to Hub OAuth2 login page and could be used on external website.
Service Name
Input field to add name of the service which will appears on OAuth2 login page.
Communication Type
Section where the communication type can be selected to define how the Hub will interact (sending session data) with an external section. There are two options:
Post message - a common way for OAuth2 login when data is sent by window.opener.postMessage(JSON.stringify(data))
Redirect - communication type to send session_uuid in URL via redirect (e.g. https://redirect.com/oauth2/success?session_uuid=…)
Example
Section to simplify integration
Code block content is different based on selected Communication type (Post message|Redirect)
Dashboard Identifier: A unique ID for the dashboard itself.
Quick Seal: A quick-access identifier for the dashboard.
Save and Cancel: Users can save the dashboard or cancel the creation process using the respective buttons after filling in the fields.


Personal information
First name
Last name
Display name
Location
Bio
Profile image
Login Settings
Email address
Password with Edit password button
Multi-factor authentication
Session timeout
Multi-factor authentication (MFA)
Verify logins by email
Verify logins with SMS


View all comments for an asset.
Sort or filter comments.
Like or dislike comments.
Mark comments as "Resolved."
Start a new discussion from a comment.

Specify (or update) a billing address and contact email for invoicing
Payment method: Card
Once "CARD" is selected, you will be required to enter your card details, which will be used to make payments.
Payment method: Bank (manual)
Once "Bank (manual)" is selected, you will receive invoices by email based on your billing frequency (by default: monthly) and will have to pay via bank transfer on the designated account (IBAN).
Payment method: Direct debit
Once "Direct debit" is selected, you must enter your IBAN, which will be used to make automatic bank payments.


Third-party product integration
In ecosystem integration, seamless connectivity facilitates communication and interaction between third-party components.
This introductory guide aims to clarify the distinctions among the two main types of software connections: plugins and connectors (aka applications).
Plugins are software components designed to extend the functionality of a more extensive application. They allow developers to add specific features or behaviours to an existing software system without modifying its core codebase. Plugins are usually loaded dynamically at runtime, making adding or removing them easier without affecting the main application's stability.
Plugins provide a modular approach to integration, enabling third-party developers to seamlessly integrate DAM into the host application/software. Simply use our Media Asset Widget to replace or complement the media gallery used by the third-party software/tool.
Applications, also known as standalone connectors or adapters, are complete and self-contained entities designed to perform specific tasks or provide a range of functionalities to users. Unlike plugins and libraries, applications are intended to be independent and tightly integrated.
Our applications have user interfaces (UI) and may interact independently with other applications or services. They will always perform a range of additional functions, such as programmatic synchronisation and similar advanced features.
In summary, plugins extend the functionality of existing applications with a more passive role, while applications/connectors facilitate interoperability and seamless synchronisation between different systems by being placed in between them and actively intervening.
A manual integration will always be possible using our Media Asset Widget, whose code/package is linked in this documentation.
About
Displays the current version of Scaleflex DAM and Copyright information.
Documentation
Provides access to the Scaleflex documentation
Release Notes
Access the release notes to see the recent releases and updates made on Scaleflex DAM
Help/Knowledge base
Another source of information, this accesses the Scaleflex knowledge base
Request Support

Make a direct request or report a bug to the Support team.
Filter
Description
Date range
Values: Date ranges with format DD/MM/YYYY Default value: Last 30 days
Purpose: specify the time frame of the viewed stats
Graph name
Description
Invited (activated) users
It shows the number of activated users per token for the selected time frame
Users logged in today
It shows the number of users logged in per token for the selected time frame
Invited (pending) users
It shows the number of pending users per token for the selected time frame
Number of teams with users
It shows the number of activated users per token for the selected time frame
Most active users
It shows users with the most logins for the selected time frame and token.
Number of unique users logged-In per day
It shows number of unique users logged-in aggregated by day for the selected time frame and token.
You can either use the web client or the desktop Canva application
On the left Menu sidebar, navigate to "Apps".
Enter "Scaleflex" in the search field, and click the app to open/use it.
Choose the project you want to use the app with (existing or new),
Click the "Connect" button to open the authentication modal of the Scaleflex DAM, and enter:
Project identifier: aka the "token" from Scaleflex DAM, that can be found on the top right menu of the VXP interface, or communicated by your administrator.
Security Identifier: aka the "sec template" from Scaleflex DAM, that will be used to obtain a “limited-time access”. See the Security Templates documentation for more details.
Upload directory: The "root" folder from where you will load your digital assets on the Scaleflex DAM platform (has to be consistant with and allowed by the "security identifier" settings)
Navigate, browse, and search for your Scaleflex DAM image and video assets for your Canva designs.
Drag and drop to add the image/video to your design.
Step 1. Download the extension files from the link and unzip them.
(use the following in your browser if you can't download from the above URL link)
Step 2. Copy the unzipped folder content into the folder for your Creative Cloud version:
If you have Photoshop CC 2014, CC 2015, CC 2015.5, CC 2017 or above:
Mac OS: /Library/Application Support/Adobe/CEP/extensions/
Windows x64: C:/Program Files (x86)/Common Files/Adobe/CEP/extensions/
If you have Photoshop CC:
Mac OS: /Library/Application Support/Adobe/CEPServiceManager4/extensions/
Windows x64: C:/Program Files (x86)/Common Files/Adobe/CEPServiceManager4/extensions/
You have to create the folder if it does not already exist.
Step 3. Restart Photoshop, and you will find the DAM widget/extension in Window > Extensions > extension_name.
First, you need to log in to your DAM account from the Widget.
Then, you can select the Company and Project you would like to access (for multi-project DAM accounts).
You can browse your container and its folder structure directly from the widget, use the search and sort functions, and create folders.
You can upload images from Photoshop directly to your DAM container. Downloaded images from DAM can be inserted as a new file or layer in an existing Photoshop project.
Step 1: Download the latest version from https://www.drupal.org/project/filerobot_by_scaleflex/releases;
Step 2: Extract the zip file in /modules;
Step 3: In the Drual admin, navigate to Extend / find Filerobot by Scaleflex / Install
Install with Packagist
Step 1: Run composer require 'drupal/filerobot_by_scaleflex:^1.0'
Step 2: In the Drupal admin, navigate to Extend / find Filerobot by Scaleflex / Install
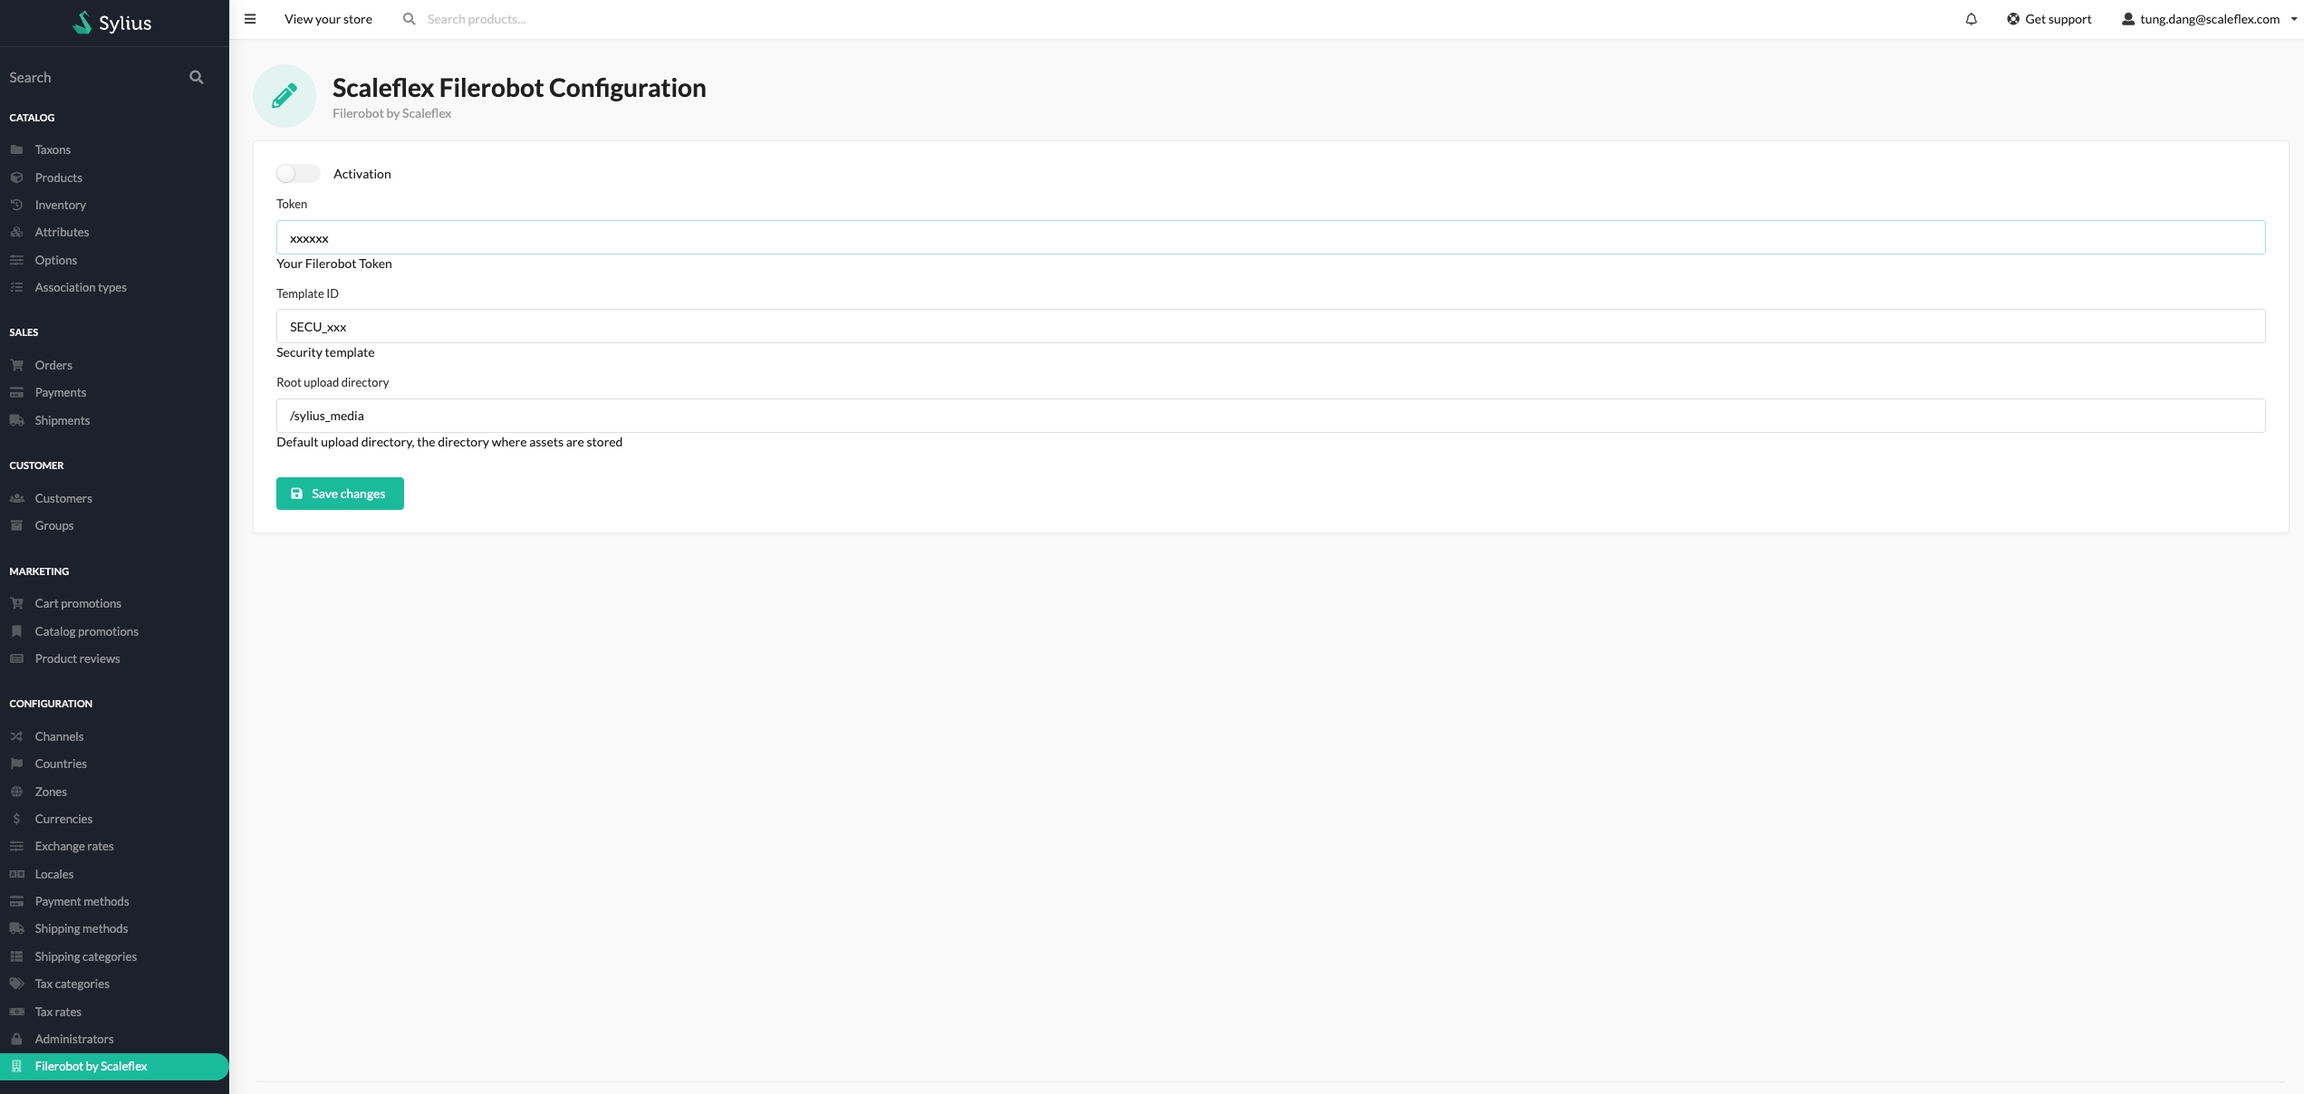
Activation: You can enable or disable the module;
Token: Your token from the DAM;
CNAME: If you have a CNAME configure in DAM, you can enter it in this field;
Security Template Identifier: To load the DAM Widget or DAM Image Editor, you need to create a Security Template in your DAM Asset Hub first. This will grant your Drupal instance the necessary credentials to access your storage;
DAM upload directory: The directory in your DAM account where the files will be stored.
You need to click the Update widget to load the image after choosing the image from the DAM widget.
Current status of the ticket
In addition, you can make a direct request to the Support team by clicking the + Send request button.
When clicking the + Send request button, a form will appear. You can provide a title, message, and any attachments to the request.
Ticket ID
Number of Ticket request
Title
Title of created ticket
Updated at
Date and time of last comment or action made on ticket
Updated by
Name of user that last updated the ticket
Message
Preview of message sent within ticket
Status
Then login using your usual credentials in Canva and create at will
Finally, click the "Publish" button (3) on the top right corner of the Canva interface
This will import your creation as a regular asset, added to the current folder with a simple click on "upload" (4) If you need any pre-upload transformations you could set them to execute from the "Settings" side panel
Third-party asset upload and download
Airbox enables non-registered users to upload files through public links, offering a simple way to collect files. You can set optional activation and expiration dates and password protection for each Airbox instance. Additionally, you can invite users via email, set upload limitations, and receive notifications when assets are uploaded.
To create an Airbox instance:
Select Airbox from the left menu in your Scaleflex DAM library.
Click on + Add airbox.
Type meaningful title and description for the new Airbox.
Select the target folder in Scaleflex DAM where uploaded files will be stored. If the selected folder is already in use by another active Airbox, an alert will notify you. Choose a unique folder to avoid conflicts.
Set start and expiration dates (optional).
Enable password protection (optional).
Set limitations per file size, total number of uploaded assets, etc (optional)
Set who should receive notifications when files are uploaded to the Airbox (optional).
To edit or delete an Airbox, go to the 'Airbox' section in the left menu of your Library.
Customize Scaleflex DAM's branding to match your brand preferences
Dam Traffic Origin
The Edit video feature allows you to modify video files directly within the Asset Details window or via the "right click" menu in the Library.
Just like with images, you can adjust basic properties and trim content, then save the modified output as a new version or a new file.
In order to make surgical edits or quicker ones, you can modify the play speed from 0.25x to 2x, by selecting it in the bottom right corner as shown below (note that this setting is valid for the player only and is not modifying the actual output video speed).
Operations overview:
Adjust
Reframe (standard ratio and social media presets)
Rotate (angle in degrees)
Flip X (letf/right) and Y (top/bottom)
Trim
Modify start & end
Split (cut from middle of the video)
Resize
Width & height
Aspect ratio lock - whether to keep the aspect ratio when changing any dimension
The asset's custom defined or embedded metadata
The Metadata tab holds information about the asset's custom defined or embedded metadata and is organised in 2 relevant sub-tabs.
You can create and customize metadata fields to fit your needs. These fields are categorised and apply to all assets within a specific Scaleflex DAM project (token). If you manage multiple projects, each can have its own unique metadata structure.
The Custom metadata fields are visible in the asset management modal, tab Metadata -> Custom.
Embedded metadata is stored within the asset itself and remains with it when the file is shared or downloaded. Various software tools can access and read this metadata. Examples of embedded metadata include GPS coordinates, the author's name, camera details, and more.
Scaleflex DAM can extract embedded metadata, even from custom namespaces (e.g. model name, product category), and map them to fields in the section.
To enable embedded metadata extraction:
Go to Settings > DAM > Automations.
Enable the Extract embedded metadata post-process.
Once enabled and saved, embedded metadata will be automatically extracted upon file upload and displayed in the Metadata -> Embedded tab of the asset management modal.
Use the context menu to perform various actions on an asset in the Asset Details window.
Next to the Regional settings, you will find three dots '...' button with which you can access a menu of actions you can perform on the asset:
Download
Download the asset in its original form, as a transformed image, or export its metadata in a CSV file.
Share
Publish the asset to enable public CDN links, share it via or Embed the link in a webpage and manage access for users and teams
+ Add to
Add the asset to My favorites list or to the Download cart
Labels
DAM Prestashop plugin
Supports the default versions of Product Media and TinyMCE (and not other TinyMCE Plugins);
Supports Prestashop from version 1.7.8.7 onwards.
if you don't already have a DAM account.
- Download the DAM module
Step 1:
Step 2: Unzip the file and change the folder name to "DAM"
Step 3: Zip the file with the name "DAM.zip"
Step 4: In Admin go to Modules/Module Manager -> Upload the Zipped file
- From the Marketplace
Step 1: In Admin go to Modules/Module Catalog and search for "Filerobot by Scaleflex"
Step 2: Click "Install"
3. Configuration
Step 3: Go to Modules/Module Manager -> Other Section -> Click on Configure on "Filerobot by Scaleflex"
Step 4: Update the configuration (credentials) and activate the Module, then your site is ready to go.
Activation: Enable/Disable the module
Token: Your DAM Token
Security template identifier: Your DAM security template (in Project > Access > Security templates tab)
DAM upload directory: The directory where you want to store/manage assets
4. User guide
Product media
Go to Catalog/Product -> Click + button in Product Images
Choose images and click Insert
Product WYSIWYG
Click the image icon on WYSIWYG
Then it is the same as for a Product Media click Insert after choosing your image(s)
There are 2 versions(sync way) in Akeneo App:
Metadata version: Which is new support sync assets and product by metadata.
UI version: Setting and Support sync by UI
* Available only in the SaaS (Enterprise) version
Metadata version support Bi-Direction Sync(DAM to PIM, PIM to DAM)
Depending on your Akeneo version you will install our Connector/App in a differnt way:
A collection is a group of related assets defined by metadata.
The main difference between grouping assets via Folders, Labels, My favourites vs Collections is that the membership of assets to a group is dynamic when using collections. This means that assets are automatically added or removed from a collection based on their technical properties and metadata values.
You can access the Collections view from the main menu on the Library page.
In the collections list, the collections submenu has the following options:
Name: sort by name ascending or descending
“Sort” icon: if the collections are currently sorted by name ascending, then this will sort them descending and vice-versa
“Planet” icon: allows to select the metadata/tags language
Refresh: refreshes the collections list
You can do this by clicking on the button + Add collection. A pop-up configuration panel will appear, prompting you to specify the collection’s name and settings.
Name - Please specify a meaningful collection name
Access - by default it is Company. Only users with access to DAM Hub can see these assets.
Groups- The groups contain a list of pre-defined collection criteria that can be combined together.
Click on the "Settings" icon in the left panel of the page to open the Configuration window, which allows you to manage your collections.
That will open the "Manage collections" window where you can Search, Add new collections, Edit the current configuration or Delete existing collections.
The first information seen when viewing an asset through the Asset window, this provides the overall basic information of the asset.
The General Information tab provides the following information about the current asset you are viewing:
Type
This displays the format of the asset
Size
This displays the filesize of the asset in MBs.
Resolution
The dimensions of the asset -width & height.
Integrate Hygraph with DAM by Scaleflex to bring in and manage your digital assets seamlessly from the DAM as the Single Source of Truth.
With this application, users can upload, store, edit, manage, optimize, enrich and automate their media assets right within their Hygraph UI, saving time and better enhancing their workflow.
Publish your Media Assets directly from within Hygraph with the Media Asset Widget:
As Original: This option is available for all assets. Adds them to the content entry as is, as a preview or downloadable element.
As Transformation: This option is only available for image assets. It lets you modify the image format, quality, size, and even to crop part of it.
This integration is developed and maintained by our partner Hygraph.
Useful resources:
General information:
Installation guide:
Hygraph community (slack):
"My Favorites" are typically used to quickly access frequently visited assets. They provide a way to create a personalized flat list of preferred items for easy access.
Users can mark assets as favorites and view / search these assets under the My favorites submenu for quick access. Each asset can be marked as favorite or not and each user can access their list of favorite assets via Menu > My favorites:
The user can add an asset to My favorites list by simply clicking on the heart icon at the bottom right corner of the asset:
An asset whose icon is colored in purple is already added to this list, while an asset whose icon is in grey is not part of My favorites.
Users can add multiple assets in bulk to My favorites list by selecting them and then opening ... -> Add to -> My favorites in the Navigation bar:
In the same way, an asset or a group of assets that are already added to My favorites list can be removed from there.
DAM Zapier integration
Zapier connects over 3,000 different tools, applications, and services you need to manage your business. Their simple integration platform allows anyone to seamlessly integrate DAM with other applications to automate workflows.
The DAM integration allows to:
Setup a trigger when a new file is uploaded to DAM (useful for setting up notifications, transforming uploaded files or using other tools)
Upload new files to DAM
Transform files in DAM (this is done by adding to the file CDN link)
Search for existing files and folders
Create folders
Start a new Zap and add a tool to start the trigger with. It can be DAM or any other tool. DAM can either start the Zap or execute the actions for the trigger coming from other tools, as shown in the example below.
Once the DAM trigger/action is added, you will be asked to "Choose account" to connect to DAM.
New browser window will pop up asking for authentication details to DAM Asset Hub.
DAM Token can be found in the DAM Asset Hub project selector and next to the project title. While DAM API Secret Key is available in Settings > Access > Security templates (tab) menu in the DAM Asset Hub. Make sure the API Secret Key has the minimum required permission for the actions of the Zap.
Once done, you have successfully connected your DAM account to your Zapier account.
After the account is successfully configured and authenticated, you will be able to set up the triggers and actions for execution.
When selecting the Folder Path, if you leave it as a default option, it will only do actions on the Root folder of your DAM account. When looking for a specific folder, you can add the folder path manually or use the search function for exiting folders in the Root folder path.
DAM Standard Dashboard
The Standard Dashboards Configuration section allows users to enable or disable various pre-built dashboards that help monitor and manage key asset delivery and usage areas. These dashboards provide insights into different aspects of the system, including CDN performance, optimization, storage, and more.
The Roles page displays all current Roles and their permissions within Scaleflex DAM.
Labels are used for categorizing and describing items, allowing for flexible grouping and easy Search. One asset can have multiple labels.
Labels allow users to organise their assets in a more structured and permanent way than Tags. Unlike the dynamic Collections whose assets change through applicable filters, they are static and are similar in principle to the labels on physical products (drinks, foods, clothes).
Users can still modify a given label and/or change which assets fall under it.
The system also allows users to view and search the labels and their applicable assets.
DAM Products Management
The Product feature helps you organize and quickly find files by grouping them using specific product references. Once enabled, users can add two new metadata fields—Product Reference and Product Position—to their assets.
Marking assets with Product References makes it easy to locate materials for seasonal promotions or product launches.
Leverage the in-built Image Editor to adjust or enhance your image asset directly within the platform
If you have an image asset (jpg, png, webm, etc) you can modify it with the in-built Image Editor in a multitude of ways, including cropping, resizing, applying filters or watermarks, and so on. You can save the results as a new version of the main image or as an entirely new asset.
Click the Edit image button from the context menu or in the Asset Details window to open it in the Image Editor.
The Image Editor is a feature-rich inline image editor that supports the most commonly used image editing function of image editing software:
You will find here the list of Scaleflex's most popular connectors with a brief descriptions on how to set them up.
If a connector is not in the documented list, feel free to reach out to our Support team who will know if it is in the making or if we have it on our rich roadmap.
You will in general need at least 2 information for the basic setup of a connector:
Your "TOKEN" (aka Project identifier), located there:
Your "SEC_TEMPLATE" (Security template), located there:
Users per team
It shows the users per team. for the selected time frame and token.
Filter
Description
Date range
Values: Date ranges with format DD/MM/YYYY Default value: Last 30 days
Purpose: specify the time frame of the viewed stats
Graph name
Description
Referrers overview / period
This table presents a comprehensive overview of incoming requests, describing the percentage distribution based on whether they are accompanied by referrers or are without referrers.
Also, it shows the daily Traffic and requests for the selected period.
Top 10 referrers / period
This table presents the top 10 Referrers requested for the selected period, broken down by the referrer domain, Also, it shows the daily Traffic and requests for the selected period, and the total number of requests for each referrer domain.
Top 10 referrer URLs (last 30 days)
This table displays the top requested Referrers in the last 30 days only also the associated traffic for each referrer.
Attach labels to categorize and group assets, making them easier to organize and find later.
Edit media (image / video / design template)
Use the built-in Editor to adjust or enhance the media asset directly within the platform.
Comments
Access the comments to make a note on the asset.
More actions
Locate where the asset is stored within the DAM or manage its approval status for team workflows.
Rename
Change the name of the asset
Move to
Move the asset to another folder in the DAM
Delete
Remove the asset from the DAM

"Info" icon: if an asset is selected, provide additional details for it
"Cart icon": a collection of downloaded assets.


Login page layout
Select the layout of the login page
Background cover type
Select the background of the login page: color or an image
Cover
Select a background image if you have selected the image option or the main color, if you have selected the color option
company logo
Upload a project (or company) logo to be displayed on the top-left corner of the Asset Hub. You can add logos that accomodate to Light and Dark themes.
Favicon
Upload a custom favicon to replace the default Scaleflex DAM favicon.
Theme
Select between Dark, Light and Custom theme.
Color
Add your own color-hex code to override the Asset Hub's default colour.
Default number format
Set the format for the thousands and decimal separators in numbers


Location
Location of asset within the DAM
Labels
Displays if any labels are attached to the asset
Orientation
Displays in which orientation the asset is in (landscape/portrait)
Visibility
If the asset is public or private
Main colors
This displays the main colors seen within the asset
Dominant color
This displays the most dominant color spotted within the asset
Created at
Creation date of the asset within the DAM
Created by
The user who created the asset in the DAM
Modified at
Last date when the asset was edited or its metadata has been changed.
Expiry date
The date when the asset expires (in the context of the business usecase of the project)
Approval status
The asset's status in the Approval workflow
UUID
The file UUID
Name
Defines the name of the image.
Title
Defines the title of the image .
Description
The user can describe the image description.
Tags
The user can create tags, generate AI-suggested automated tags, and, at that same time delete all the tags using clear all button.


It shows the total image cache for a specific set of tokens, aggregated by day. for the selected time frame and tokens.
Filter
Description
Tokens
Values: Tokens owned by the same company Default value: All Tokens Purpose: Specify tokens to view stats accordingly.
Date range
Values: Date ranges with format DD/MM/YYYY Default value: Last 30 days
Purpose: specify the time frame of the viewed stats
Graph name
Description
Traffic & Image Cache allowances per token
It shows the current plan, storage allowance and Traffic allowance per token
Traffic & Image Cache per token
It shows the Number of Requests, Traffic, Maximum Cache value and Average Cache value per token for the selected time frame
Total Requests / Period
It shows total number of requests for the selected time frame and tokens.
Total Traffic / Period
It shows total CDN traffic for the selected time frame and tokens.
Total Image Cache / Period
It shows total image Cache for the selected time frame and tokens.
Global Traffic per day
It shows the total CDN traffic for a specific set of tokens, aggregated by day. for the selected time frame and tokens.
Global Image Cache per day
Entity Reference*
Image(Binary)
Text
Product
Image Field(Binary)
Text
Asset Manager*
Media Type
Text / Textarea
No Chanel / No Locale
Locale support(Use Variant in DAM)
Attribute code and Metadata Key MUST MATCH in both system
Single Select
No Chanel / No Locale
Attribute code and Metadata Key MUST MATCH in both system
Options value must be the same in both system
Multiple Select
No Chanel / No Locale
Attribute code and Metadata Key MUST MATCH in both system
Options value must be the same in both system


Filter
Description
Date range
Values: Date ranges with format DD/MM/YYYY Default value: Last 30 days
Purpose: specify the time frame of the viewed stats
Graph name
Description
Daily Image Cache
This graph shows the total value of the image cache per day
Cache average / period
This graph shows the average value of the image cache for the selected timeframe
Cache minimum / period
This graph shows the minimum value of the image cache for the selected timeframe
Cache maximum / period
This graph shows the maximum value of the image cache for the selected timeframe
Daily Edge Requests
This graph shows the total number of edge requests per day in the selected timeframe
Requests total / period
This graph shows the total number of edge requests in the selected timeframe
Users & Teams
Provides insights into user activity, roles, and team management.
Enabled/Disabled
Monitor and manage user roles, team activities, and access levels.
CDN & Delivery
Monitors CDN performance and asset delivery.
Enabled/Disabled
Track CDN efficiency and asset delivery speed and accuracy.
Delivery
Offers delivery-specific data like response times and geographical distribution.
Enabled/Disabled
Enable or Disable Dashboards: Toggle switches are available for each dashboard.
Enabled: The dashboard is active and providing insights.
Disabled: The dashboard is inactive.
Choose the scope:
Company: Apply across all projects within the organization.
Project: Apply only within a specific project.
Name the role.
Select the permissions you want to assign (e.g., managing users, approving assets, editing settings).
The permissions are divided in several categories:
Home - allows access to the settings for the Home page
DAM - allows access to the DAM Gallery menu
DMO - allows access to the DMO settings.
Settings/ Organization - controls on the settings
Settings/ Project - controls on the settings
Settings/ DAM - controls on the settings
Settings/ DMO - controls on the settings
Users with custom roles can edit the access of another users with standard roles, if they have the corresponding permission in their custom role (Settings/Organization => Users (read) => Users (write) )
If you want to modify an existing role (e.g., enrich or limit one of the default VXP roles), you can duplicate it and adjust its permissions.
For that purpose you need to click on the ... icon next to the corresponding role.
The default company roles can not be deleted.
Default language
When a language is selected, it will be shown by default to all users.
Please note that each user can change it individually through the settings in My Account.
Session Timeout
This is the default session timeout, which logs out the user after a certain amount of time after the last activity was made.
In this section, the company-wide security settings can be specified.
Multi-factor authentication
Enable or disable MFA for the entire company. The MFA code will be sent via their phone or email. Please note that MFA is bypassed if SSO is enabled.
Single sign-on (SSO)
Configure SAMLv2-based SSO to enable users to access the Asset Hub using SSO via an Identity Provider (IdP). You will still need to create the users in Scaleflex DAM before they will be able to login via SSO.
To configure SAMLv2-based SSO, click on the Add SSO connection button. Any Identity Provider supporting the SAMLv2 protocol is supported.
After saving the SSO connection, every user attempting to log in with an email address from the domain configured in Step 3 will be redirected to the configured Identity Provider and automatically logged into the Asset Hub if an active SAMLv2 session is enabled.
Prompt new users to accept the company's T & Cs on first login
Enable or disable the requirement for users to accept the customizable T&Cs upon first login
T & Cs text
The custom text or HTML to display to users on their first login. Supports multiple languages.
Force all users to accept the new T & Cs
Modifying the content of the Ts & Cs will create a new version. Enabling this setting will force users who have already accepted the previous version to accept the updated version upon their next login.
Company name

The company name displayed in the upper left corner of the Asset Hub, unless a project logo has been uploaded under Branding
The Labels page can be accessed from the DAM sidebar menu.
You can create named, colour-coded labels by clicking on + Add label button. This allows you to list and place all assets assigned to a specific label in a single view.
Title - please choose a meaningful name for your new label
Colour selector - choose a color by clicking a pre-defined color or by entering an RGB code manually.
Pinned - if this checkbox is marked, then the new label will appear on the top of the labels list. On Sort the system will sort first the Pinned labels and then will show the other ones.
To manage labels, click the 'Settings' icon in the left panel. This opens the Configuration window.
That will open the "Manage labels" window where you have options to Search, Add new labels, Edit the current configuration or Delete existing labels.
Right-click on an asset (or multiple selected assets) and choose the 'Manage' > 'Labels' submenu to search for and apply a label.
If no exact match is found during the search, the user can create a new label and apply it to the asset immediately.
This function is available on the Labels page when selecting a file and opening its context menu:
The user can select multiple files too and use the ... icon in the Navigation bar in order to access the same option.
In both cases, the user should have a Developer, Manager, Admin, or Owner User Role to detach a label.
You can search by specific search criteria inside the pool of all assets assigned to a specific label, using the main Search box:
If you are interested in finding all assets assigned to a specific label, you can search for this label's name in the Search box at the left panel and then click on the result.
To enable this feature, navigate to Settings > DAM > Library > Featured Components and turn on the Products feature to automatically add the Product Reference and Product Position fields.
A product will appear in the Products view only if at least one asset has this Product as assigned in its Product reference field.
Products are automatically removed from the Products view when no assets are associated with them.
To add Product metadata to an asset:
Select the asset
Open the Details view
Go to Metadata > Custom
Click the Edit button
Add or update the Product reference and Product position fields.
Save the changes.
Product Reference identifies the specific product to which the asset is related. Product Position specifies the order in which assets appear within a product group. For example, it determines the sequence of images in a promotional campaign.
To detach product metadata from an asset:
Select the asset and open the Details view.
Navigate to Metadata > Custom.
Click the Edit button.
Clear the Product reference and Product position fields.
Save the changes.
The list of Products can be found at Menu > Products (the Product view).
All users can see the products in this View, as long as it is enabled from the configuration settings and there are assets associated with the products.
The Product Position value of an asset determines the order of the files in the detailed view when a Product is selected.
Use the Products filter in the search bar to find assets:
Search by single reference: Enter one product reference to retrieve its associated assets
Bulk reference search: Use the Add List option in the filter to paste multiple references (one per line). The system will automatically format the input and display results for all referenced products.

Adjust
Custom - choose from predefined crop sizes, including common formats for social media banners, logos, and more
Rotate - option to rotate the image per 90 degrees
Flip X - flip the image horizontally
Flip Y - flip the image vertically
Resize
Manually set your image's width and height or drag to resize using your mouse.
Finetune
Brightness—Control how light or dark your image appears.
Contrast - Increase or decrease the contrast between light and dark areas.
HSV—Adjust the color (Hue), intensity (Saturation), and brightness (Value) of your image to create the desired look.
Filters
Select from more than 40 filters to enhance your images.
Watermark
Add watermark - add an already uploaded watermark image to your asset
Upload watermark - choose an image to be applied as a watermark
Add as text - create a watermark of your choice, applying it as a free text to your image
Annotate
Sketching tool

DAM Assets Management
Upload assets in bulk from your local computer or various external sources.
The Uploader lets you upload assets in the DAM from a variety of sources:
Your device's storage, camera or screen
Web links
Third-party sources include Google Drive, Dropbox, Instagram, and many others.
You can drag & drop, copy & paste or browse to the file's location to select it for upload:
You can transform your assets as part of the upload process.
Once you click the Upload button, a progress icon is shown on each asset, as well as an overall Progress bar underneath the Upload modal, showing the cumulative progress of all assets:
There are three possible end states and relevant actions:
updated: 28.11.2025
Each Visual Operation involves a call to a video processing or AI API. Credits are valid for use over a 12-month period. Payments for credits will follow the same schedule as your subscription, keeping everything simple and aligned.
Advanced search and filtering
The search bar allows user to use simple search with keywords that will find and display the most relevant assets found.
It is the search triggered by default when you use the main text bar, and looks for the entered keyword in title, description, filename, tags, along with all custom metadata.
Sorted by relevance (sorting adjustable afterward).
In the search keyword, any non-alphanumeric character is taken as a separator (eg "-" or "_") and the operation between those sub-keywords is AND.
If this search is used along with filters (mentioned below), it will be an AND operation between them.
The results returned by this search are divided into 2 sections, in order:
Exact: all complete sequences of alphanumeric characters (at least) are matched.
Partial/Fuzzy (aka extended): truncated sequence of alphanumeric characters, including small variations (e.g. typo), provided relevance is above a threshold (70% by default).
It is activated by typing the @ sign and selecting one of the dedicated search operator (filename,...). This allows user to search in specific fields - file, metadata, asset properties, etc.
User can also use the Context dropdown to narrow down the search scope to a specific folder or to Favourites.
DAM Folder Management
In the DAM, you can organize your assets by folders. This view is available in the left panel of the Library under the name "Folders":
It consists of a navigation panel where the folders and their sub-folders are hierarchically ordered and an expanded view where you can preview the content of the current folder. It is available in a Grid view or a List. The view is controlled by the following icon:
If you select a single folder and then click on the " Info" icon at the top right part of the page, you will open a panel showing the folder's details:
You can use the button at the top right part of the page to create a new folder. The new folder will be created as a sub-folder of your current folder's location.
Folder access settings ensure the right users have the appropriate permissions to view, edit, or manage assets, enhancing security and organization.
This feature is available for users with a Manager, Admin or Owner .
Navigate to the folder you want to manage.
Click the ... icon next to the folder name.
Select Share > Manage access from the dropdown menu.
In the pop-up window, review the following details:
Folder Owner: The user who created the folder.
Default Visibility: Predefined access for users without explicit permissions. See .
Current Access Mode: Determines if settings are inherited or overridden.
The company Owner, Administrators and folder owner have unrestricted access to view and edit the folder, no matter the permissions.
If you select a folder and open its context menu, you can download its content. The same action is available from the navigation bar and the download icon at the top right corner of the selected folder. The content is exported as a ZIP archive.
This option is useful when getting details about the folder's content.
Please select the folder, open the context menu, and choose "More actions -> Export list of files (CSV)." At this step, you can choose to export the file details of the entire project or only the files placed directly in the selected folder or the folder + its nested sub-folders.
The information that is exported in the CSV contains:
Item Type
Path CDN link
mime-type size
SHA1
If you know the name of the folder in which you are interested, you can jump directly into it using the small Search folders box:
You can also perform actions such as downloading folders, sharing them, editing via CSV, moving folders to different locations, and deleting folders directly while searching for the desired folder.
If you know that some file is located in a specific folder, you can use the main Search box to specify this folder and then apply additional search criteria in order to find the files you are interested in:
DAM x Opencart v4 plugin
The DAM Plugin is an extension which adds Asset Management to Opencart.
There are 3 simple steps for enabling the DAM plugin on your Opencart admin:
Obtain a DAM token (request it here);
Install the DAM module for Opencart;
Add your security configuration parameters to access your DAM library.
if you don't already have a DAM account.
Login to Admin Dashboard
Go to Extensions > Installer and upload the file filerobot.ocmod.zip
Install DAM plugin
Navigate to Extensions/Extensions, choose Modules from the drop-down menu, select Filerobot and update all configurations.
DAM Token: Your DAM token from the Asset Hub interface;
Security Template Identifier: Security template ID, found in the Project > Access > Security templates tab;
DAM upload directory: This is the top storage folder for your assets.
You need to enable the extension in order to use DAM in all pages.
With Ckeditor:
With Image field:
If you are on Ckeditor: You can select multiple images for insertion.
If you are in an Image Field: You should select only one. If you selected multiple items, it will use the last one, as Opencart's Image Field inserts only one image at a time.
This extension is 100% compatible with the default theme.
If you use another theme (stock or custom), you should verify that the image is indeed from DAM before returning data to the view. An examples for banners would be:
Copy
DAM Opencart plugin
The DAM Plugin is an extension which adds Asset Management to Opencart.
There are 3 simple steps for enabling the DAM plugin on your Opencart admin:
Obtain a DAM token (request it here);
Install the DAM module for Opencart;
Add your security configuration parameters to access your DAM library.
Currently, the plugin supports the default WYSIWYG editor from Opencart - Summernote, but the native "Image resize" function is disabled. You can change the image size by removing the previous one then add it with new dimensions (a dedicated function will be added in the next version).
if you don't already have a DAM account.
Upload the admin folder in upload/admin to your Opencart source code.
Login to the Admin Dashboard, navigate to Extensions/Installers and upload the scaleflex_filerobot.ocmod.zip file. Then, go to Modification and click Reload to update the installer.
Navigate to Extensions/Extensions, choose Modules from the drop-down menu, select DAM and update all configurations.
DAM Token: Your DAM token from the Asset Hub interface;
Security Template Identifier: Security template ID, found in the Project > Access > Security templates;
DAM upload directory: This is the top storage folder for your assets.
You need to enable the extension in order to use DAM in all pages.
With Summernote:
With Image field:
If you are on Summernote: You can select multiple images for insertion.
If you are in an Image Field: You should select only one. If you selected multiple items, it will use the last one, as Opencart's Image Field inserts only one image at a time.
This extension is 100% compatible with the default theme.
If you use another theme (stock or custom), you should verify that the image is indeed from DAM before returning data to the view. An examples for banners would be:
DAM Contentstack App
The features of the DAM Contentstack App include:
Asset Manager Widget in Contentstack Content Management;
Multiple file type support;
Metadata sync: asset metadata from DAM will show on your Rest/GraphQL response.
if you don't already have a DAM account.
Sign up to Contentstack.
Updating
Security Template Identifier: Found in the Project > Access > Security Templates tab, this key is required for secure access
Asset
Container: Your DAM token from the Asset Hub interface
Custom Field
JSON Rich Text Editor
Step 1. On Content Type Menu
Step 2. Select Scaleflex Filerobot
Step 3. Save and Close
Step 4. On Your Entry open DAM and choose image Step 5. Publish
Step 1. On Content Type Menu
Step 2. Select Scaleflex DAM
Step 3. Save and Close
Step 4. On Your Entry open DAM and choose image
Step 5. Publish
Custom Field
JSON Rich Text Editor
DAM x Strapi plugin
To get Scaleflex DAM integrated you will need to set up these 2 components:
Scaleflex DAM plugin: https://github.com/scaleflex/strapi-plugin-filerobot/blob/v4/README.md;
DAM upload-provider: https://github.com/scaleflex/strapi-provider-upload-filerobot/blob/v4/README.md.
Benefits:
All your media will be hosted on Scaleflex DAM;
You have the option to synchronize all your existing media to Scaleflex DAM;
You will have access to the Media Asset Widget (MAW), where you can upload media to Scaleflex DAM and select media from Scaleflex DAM.
Additional workflows or enrichments can be performed from the DAM UI
if you don't already have a Scaleflex DAM account.
Install the Scaleflex DAM plugin and you should see Scaleflex DAM in the left menu.
The following options are available to you:
Then, install the DAM upload provider. Every media you upload will have DAM URLs:
Upload media to Scaleflex DAM:
Select media from Scaleflex DAM:
Beginning with 2 local images
And 10 images on Scaleflex DAM
Synchronize
Note: Please don't close the browser tab until the sync process is done.
Results
Faceted navigation available in DAM products (Widget, Hub and Portal)
At its core, faceted navigation utilizes a faceted classification system to organize information. This system categorizes items based on multiple, independent attributes called facets. Each added facet acts as new filtering layer.
Concept: Faceted navigation falls under the umbrella of parametric search techniques. Instead of relying solely on keyword matching in a traditional search, it allows users to filter based on pre-defined parameters (facets) associated with the asset. This enables a more nuanced, smarter search experience.
Technology: Faceted navigation relies on efficient data structures and algorithms to handle large datasets and filter combinations. In essence, the system needs to quickly identify items that match all selected facet criteria. Search engines like Solr or Elastic Search are popular choices for implementing faceted navigation due to their ability to handle complex filtering operations.
Benefits: The technical aspects of faceted navigation translate into several benefits:
Drill-down refinement: Users can progressively narrow down results by applying multiple facet filters, leading to a precise subset of assets.
Faceted exploration: Faceted browsing allows users to explore different categories and discover new assets they might not have found through a simple keyword search.
Faceted navigation is applied for 4 types of attributes (as of May 8th, 2024)
Date (Uploaded and Created date)
Metadata Single-select
Metadata Multi-select
Metadata Boolean
→ Faceted navigation is only available in the "Assets" view (ie. not in the Folder view)
→ Faceted navigation section is built as a side bar at the left side of the UI, replacing entirely the filter bar (shown below, that will then be hidden) in the Assets view.
This type of navigation is activated at a {token} level, and is a global setting for all users, that can be found at the DAM-> Library -> page.
Within a metadata, the operator between 2 values or more is set to OR
Between 2 metadata or more, the operator is set to AND
In details:
Within a metadata
-> For multi-select, we provide 2 operators: AND and OR
Let assume we are calling query HAS (equal to IS but for multi-select we call it HAS just for gramatical purpose)
We will have 2 options
Metadata HAS a AND b -> expected results are files which have both values a and b, file that contains only a or b won't be returned
Metadata HAS a OR b -> expected results are files which has either a or b, file that contains both of the values will be returned also
➡️ This option cover the 1st option -> within a multi-select metadata, we will choose HAS-OR operator to cover more file results
-> For single-select, it will always be OR when users click in more than one answers as one file can not contain more than one value.
For 2 metadata or more
For faceted search, it is an AND operator between multiple metadata as the answers will be more specific and this is the main idea for faceted navigation: trimming down the most correct answers
a. Multi-select metadata "colour" with value: “red”, “white”, “black”
When "red" and "white" are searched for -> expected answers are:
Files that contain value red only
Files that contain value white only
Files that contain both value red and white
b. Single-select metadata "size" with value: “35”, “36”, “37”
When “35” and “36” are searched for -> expected answers are:
files that contain 35 value only
files that contain 36 value only
c. Now, combining the two previous examples
When “red”, “white”, “35”, “36” are searched for -> expected answers have to use AND operator to encompass the 2 metadata constraints, so answers will be assets that contain:
red and 35,
red and 36,
white and 35,
white and 36,
→ Refining searches further is leading to more accurate and relevant results.
OneTeg is a no-code integration platform as a service (iPaaS) content and data exchange solution. It allows for easy integration between the Scaleflex DAM and other systems that can run on the Cloud or On-Prem, to solve the complexities of content unification and data synchronization while providing user-driven flows for a simplified integration across platforms.
A complete list of the compatible third party software connected to Scaleflex DAM can be found here.
In order to access your DAM assets in the programs mentioned above, you must have:
an active user account in Scaleflex DAM
an active licence registered in OneTeg (ask your administrator or point of contact)
Connect to your OneTeg Dashboard
Define the Scaleflex connection {your_company}.oneteg.com/en/connections
Open the Workflow builder: {your_company}.oneteg.com/en/flows
Click the [+] icon on the top right corner to add a workflow
Full headless access to the Scaleflex DAM library and functions (ref below).
Connection configuration: you will need to use an API key ( find it there )
Exemple of workflows
Library of flows:
Details and setting of a flow
Prismic Headless CMS integration
Instead of using the /list endpoint (API documentation), this API supports Prismic's format directly.
This endpoint lists the assets with the following settings:
50 elements per pages
ordered by last_update
GET {API_SECRET_KEY}@api.filerobot.com/{TOKEN}/integration/prismic/assets
Copy-paste the cURL request in your Terminal to see the API in action.
The response format will look like this:
Where:
results_size is the total counting of the listing result; and could be easily understood as the sum of size(results) of all pages, while each page contains a maximum of 50 files.
image_url is fixed to be resized to 100x100
description would be returned as a concatenation from blob->meta->search and blob->meta->tags
CI-Hub allows you to easily open and modify assets stored in the Scaleflex DAM using Office365, Google, Figma, and Adobe software. It also allows to add a seamless integration of your Scaleflex DAM library as an extension of your own personal computer storage with the CI-Hub Drive connector, that adds a Cloud-connected "additional drive" to your Windows Explorer or Apple Finder.
A complete list of the compatible software tools for use with CI-Hub can be found here.
In order to access your DAM assets in the programs mentioned above, you must have:
an active user account in Scaleflex DAM
an active licence registered in CI-Hub (ask your administrator or point of contact)
an access (account or licence) to the software you wish to use for asset modification
installed the corresponding CI-Hub integration (aka. add-on, extension) for that software.
Please check for detailed instructions for your software.
Open the CI-Hub integration panel in the desired software and click the "Login" button
Use your CI-Hub credentials on the page "Sign in to CI HUB" and switch back to the application
Validate your Scaleflex DAM connection and authenticate
[first time] Add a connection to Scaleflex (the [+] icon on the right) and connect using your DAM credentials on the dedicated page, select your Project identifier to connect to
Please note: When you log into your Scaleflex DAM account, and select the project you wish to grant access to via CI-Hub, you must use the name shown in the top right of the Scaleflex DAM interface (in parenthesis after the projet's name).
The CI-Hub connector allows you to preview files available in DAM, then to select them for export and open them in your preferred software tool. You may modify the content within that tool and then upload the new version of the file back to Scaleflex DAM. The upload is not automatic and occurs only after the user selects this option.
The connector allows you to search for files and inspect their metadata as well.
Some types of files cannot be opened in certain software. This is a limitation of the software itself and it comes from the "specialisation" of what it is doing. For example, video files cannot be opened using the CI-Hub connector for Adobe Photoshop, nor can Excel sheets be opened using the connector for InDesign.
The Gallery and User Role permissions in Scaleflex DAM may affect the number of files accessible via CI-Hub, as well as the actions that can be applied to them. For example, if a folder is hidden from a specific user in Scaleflex DAM, its content will also be unavailable for that user in CI-Hub. Also, if the user does not have a permission to upload new files in Scaleflex DAM, it may result in a failure to upload the modified file version back to DAM after editing within the specified software.
Some software have file size limitations when importing assets from DAM. Known use cases are:

By managing User Roles and attributes effectively, your team can maintain secure, streamlined access to DAM, ensuring the right people have the right tools to succeed.
DAM Magento Plugin
The DAM Plugin is an extension which adds Asset Management to the Magento Admin (Product Images, Tinymce 4 WYSWYG) and shows it on the Front-end (Product listing page, Product detail page, Minicart, Cart Page, and Checkout Page).
There are 3 simple steps for enabling the plugin on your Magento 2 website:
Obtain a DAM token (request it );
Install the DAM module for Magento 2;
Average / day
This graph shows the average number of edge requests in the selected timeframe
Peak (10-min burst)
This graph shows the peak number of edge requests in the selected timeframe
Originals / Variants (Transformations)
This graph allows to compare the number of original requests and their variants.
Formats: Original vs Variants
Number of Originals and Variants per format in the selected timeframe
Daily Image Cache Originals vs Variants
This graph allows to compare the image cache of originals and their variants
Analyze delivery metrics and ensure assets are served optimally to different regions.
Cache & CDN
Displays cache behavior and CDN optimization details.
Enabled/Disabled
Ensure proper caching strategies and CDN utilization to optimize performance.
Optimization
Tracks optimization metrics, including image conversions and asset size reductions.
Enabled/Disabled
Monitor the effectiveness of image and file optimization efforts to improve load times.
Top-ranking
Displays rankings for top-performing assets based on key performance metrics.
Enabled/Disabled
Identify high-performing assets based on load times, views, and other important factors.
Webhooks
Provides insights into webhook activity and triggered events.
Enabled/Disabled
Track webhook usage and any events triggered by the webhooks.
Storage
Monitors storage usage for assets, detailing the consumption of resources.
Enabled/Disabled
Track storage utilization and get insights into which assets consume the most storage space.
[following times] Reload your connection to Scaleflex (the "refresh" icon at the bottom)
the integration with Google Slides that do not allow assets bigger than 8MBs. In such cases a solution could be to open the file in Powerpoint or in some of the products of Adobe.
Figma allows images with dimensions up to 4096x4096px to be imported.
The process of uploading the edited version back to DAM depends on the filename of the new file and the configuration of your Scaleflex DAM storage. If you choose the same filename and folder as the existing asset, be aware that if DAM Storage is set to 'New version,' the file will be uploaded on the top of the existing asset. If it is set to 'Overwrite,' the new file will replace the previous version, and the older file will be lost. If it is set to 'Refuse upload,' you will need to change the filename to import the new file back to the Scaleflex DAM.
The CI-Hub connector needs to actively be connected to Scaleflex DAM in order to fetch the assets content from the Storage, you therefore need to be online and have a steady internet connection.


Build using the block editor (drag & drop, configure elements individuallly)
Save


Warmth—Balance the temperature of your image between warmer (red/yellow) or cooler (blue/green) tones.

People with Access: A custom list of users or teams with specific permissions.
To add users or teams, select Override from the Access Mode dropdown and click on the Add Users button that will appear in the People with access section.
creation date
update date
visibility settings


Video transcoding and compression - above 2160p (/sec)
16
Processing
videos
Video transcoding and compression - QHD video input 2160p (/sec)
8
Processing
videos
Video transcoding and compression - Full HD video input 1080p (/sec)
4
Processing
videos
Video transcoding and compression - HD video input 720p (/sec)
2
Processing
videos
Video transcoding and compression - SD video input 360p (/sec)
1
Enrichment
images
Image to text description (Smart Alt Text)
2
Enrichment
images
Auto-tagging (per image)
16
Enrichment
images
Brand detection
71
Enrichment
images
Celebrity recognition (Face Matcher)
3
Enrichment
images
Face count
16
Enrichment
images
Image-to-text Translation (/language /operation)
0.6
Enrichment
images
Not Suitable For Work (NSFW) detection
13
Enrichment
images
OCR (text in image)
6
Transformation
images
Background removal - standard
200
Transformation
images
Background removal and retouch - incl. shadowing or background expand
1000
Transformation
images
Visual enhancement, incl. Relightening, Upscaling
1000
Transformation
images
Remove Object
800
Processing
videos
No description for this file is availableAPI_SECRET_KEY
can be generated in the Asset hub (documentation)
TOKEN
your DAM token
folder
the path to the folder you would like to list default: /
page
the result page number, starting from 1 default: 1
curl 'https://[email protected]/fdocs/integration/prismic/assets?folder=/demo'
curl 'https://[email protected]/fdocs/integration/prismic/assets?folder=/&page_num=4'{
"results_size": 81,
"results": [
{
"id": "0de50f0c-d5dd-5a8c-ae96-9b8b32e500",
"title": "c998f98fc77e833b3487b6e70dcbe0c7e62e7469cf1c572996d49e6c469e94.jpg",
"description": "Some description colorful prismic_files",
"image_url": "https://frtoksmp.filerobot.com/prismic_files/c998f98fce833b3487b6e70dcbe0c7e62e748969cf1c572996d49e6c469e94.jpg?vh=6aeec9&w=100&h=100&func=fit",
"last_update": 1603813143000,
"blob": {
"name": "c998f98fc77e833b3487b6e70dcbe0c7e62e7469cf1c572996d49e6c469e94.jpg",
"url": "https://frtoksmp.filerobot.com//prismic_files/c998f98fc77e833b3487b6e70dcbe0c7e62e7469cf1c572996d49e6c469e94.jpg?vh=6aeec9",
"type": "image/jpeg",
"size": 377727,
"info": {
"img_h": 1000,
"img_w": 803,
"img_type": "JPEG"
},
"meta": {
"test key2": null,
"test key3": null,
"qa_tags": null
"tags": [
"colorful"
],
"search": "Some description colorful prismic_files",
"description": "Some description"
},
"blurhash": null,
"created_at": "2020-10-27T15:37:25Z",
"modified_at": "2020-10-27T15:39:03Z"
}
},
...
]
}red and white and 36

You can invite new users to the DAM through the Invite Users modal.
You can create users at the company level, granting access to all projects within the company or providing access to one or multiple projects at the project level.
In the DAM, a “user role” determines what a user can see and do within the platform.
VXP Owner (company only)
Only 1 user can be the Owner of the company. It has access to all DAM pages & System Settings. Also - to all assets and folders stored in DAM, no matter who created them and what are the visibility permissions.
VXP Administrator (company only)
There could be multiple users with this User Role. They have the same visibility and privileges as the Owner. The only difference is that the Admins can not create other Admins or promote a new Owner.
VXP Accountant
This User Role has access only to the section.
VXP Manager
The Managers have access to all DAM pages & System Settings except and settings. Limitations:
Company-wide Managers can only manage users with lower roles than Manager in all company's projects.
Project-level Managers can only manage users with lower roles or another Manager in their own project.
VXP Developper
The Developers have access to all DAM pages and the following menus from System settings:
DAM
Metadata
Storage
VXP Contributor
The Contributors have no access to any System Settings.
They can only see:
Home
DAM (All pages except Labels page)
In addition to the standard roles mentioned above, VXP administrators can create up to 5 custom levels and define which pages and menus will be available for each.
To invite new users:
Click + Invite Users (single or bulk invites supported).
Fill in these details:
Email address.
Profile (User level).
Access scope (entire company or specific projects).
Click “Send” to send the email invitation.
If the invitation is still not accepted, it will be visible with status "Pending". If it remains in this status, you have the following options:
Resend the invite to remind the recipient.
Cancel and re-invite if the email address was incorrect.
Once accepted, the invited user receives status "Active".
A user can only manage lower-level users, e.g. a VXP Viewer cannot manage a VXP Manager.
The following attributes are available for editing:
User level
Active or inactive status
Access scope
Review user access quarterly to ensure permissions are up-to-date. Deactivate users who no longer need access to prevent security risks.
By default the users have email address and name. For the purpose of your project you can add additional attributes.
You need to go to the People tab and to click on the ... icon. Then to select "Manage User Attributes"
In the pop-up window that will open, you can check the current list of User Attributes.
New attributes can be added when you click on the + Add field button. There are two data types which you can select for the new field:
Text - the attribute value will be a simple text. This is applicable for fields that may have unlimited number of unique values (for example "Personal Address")
Select-one - it appears as a drop-down list with predefined values where you can choose only 1 of them. This type is useful for fields where you would like to restrict the users on what values to fill-in (for example "Region", "Job Position", etc)
If you want to Edit or Delete an existing attribute, please click on the ... icon next to the attribute name.
Enter the API key description so it can be easily identified
Select the permissions to be attached with the API key (multi-selection from the permissions list) -- these define what the user will be able to do with the assets
OBJECTS_LIST
List assets
OBJECTS_FETCH
Fetch assets
FILE_UPLOAD
Upload file
FILE_META_CREATE
Create file metadata
FILE_META_CHANGE
Update file metadata
FILE_RENAME
Rename file
Existing API keys can be managed individually or in bulk for status (Active <> Deactivate).
Description
To identify the API keys
Secret key
The API key value. To be kept secret
Created at
The API key creation date
Active
The API key status that can be toggled from activated to deactivated using the ... options
Note: If used, deactivated API keys will return an error
Copy
Copy the secret key in the clipboard for easy integration
Step 2: Rename the Zip file with the name DAM.zip
Step 3: In Admin go to Extensions / My extensions / Upload extension
Step 1: In Admin go to Extensions / Store / Catalog and search for "Filerobot by Scaleflex":
Step 2: Select the extension and choose Add extension:
Step 3: Go to Extensions / My extensions / Filerobot by Scaleflex - Digital Asset Management, Media Optimisation and Acceleration / choose Configuration:
Step 4: Update the configuration and activate the Module and your site is ready to go:
Admin access key ID: Need to generate in "Setting" to call API in Admin Dashboard;
Admin secret access key: Need to generate in "Setting" to call API in Admin Dashboard;
Folder Id: This key will auto-generate when the plugin is activated;
Activation: Enable/Disable the module;
Token: Please enter your DAM token here;
CNAME: Enter the CNAME as per the configuration in your DAM Asset Hub interface, once validated and the SSL certificate is accepted. (Or leave blank if none);
Security Template Identifier: To load the DAM Widget or DAM Image Editor, you need to create a in your DAM Asset Hub first in order for your Shopware instantiation of the DAM Widget to obtain proper credentials and access your storage;
DAM upload directory: The directory in your DAM account where the files will be stored.
The step to get "Admin access key ID" and "Admin secret access key":
**Hosted code URL: https://scaleflex.cloudimg.io/v7/plugins/filerobot-kontent/filerobot-custom-element.html?func=proxy
Parameters:
note: "dir" element is optional, by default will go to the root folder of your library. Do not add "/" at the end of the directory string.
Create new content with this Custom Element
Content & asset (left hand side) > Create new > Chose type: Your_Type_Name. Chose and add some images, publish. You will then have the below view.
The images below are the images added in from the Widget into a Kontent content-item. When they are added, they will have DAM-URLs (instead of their Strapi CMS URLs).
Go to Settings > API Keys. For this, you will need your Project ID. You may also need your API Key (depends on what you want to do, but for simple things Project ID is enough).
Write a client app that utilizes the Delivery API
Recall that Kontent have 3 sets of APIs that you can interact with
Delivery APIs in plain HTTPS form can be downloaded from https://kontent.ai/learn/tutorials/develop-apps/get-started/postman-collection/ and imported into POSTMAN
For the 3 content items that come out of the box, Kontent already have an example client app, which we can imitate.
This example app was made by using React JS https://github.com/kontent-ai/sample-app-react
Hosted on various Github Pages.
After writing and hosting your client app, go to Settings > Preview URLs and define your Preview URL formats.
See how Kontent defined their preview URLs for their example app:
Codename, URLSlug & ItemId are obtained as follows:
Once you done all the above, you can preview by clicking Preview:
Have a DAM account, with the DAM App installed. If you don't have an account yet, please contact us to get one;
Create the Security Template Identifier (SEC) to use the app (Settings > Access > Security templates tab > Add template)
You need to have a store on Shopify.
In Shopify, open the DAM app in the Apps menu item and click the button “Configuration”
Fill-in your DAM token, CNAME (not required), Security Template Identifier (SEC), Upload Directory (not required, the default will be "/"), and press “Save”
Add DAM snippets to your theme: In modal Configuration, click the button “Update Snippets” to update or create new DAM snippets in your theme store.
Add product webhooks for actions create/update/delete, that will check and update images from DAM Hub when the user has a permission to create/update/delete.
In Shopify, open the DAM app from the Apps menu item.
Click the button “Sync All Product Media”. The process will run in the background for a few minutes depending on the number of images in your store. It will download all product images from Shopify and store them in your DAM Library.
Fill in your product name. Then press "Sync":
You can add DAM images to your website by editing your theme's code.
The following snippets provide the functionality to display images on your website:
filerobot-image-tag.liquid: Builds an image tag with multiple sources to render product images on your website lazily, applying transformations.
filerobot-product-media.liquid: Uses filerobot-image-tag to render product images on your website, with optional transformations.
filerobot-url.liquid: This will help you build a DAM URL to deliver an image on your website with any transformations that you want to apply.
You can use these snippets in your theme's code, referencing them in other snippets or sections.
You can use filerobot-image-tag.liquid or filerobot-url.liquid to display DAM image on your page
First you will need to assign variable fr_metafields:
Example:
To render image tag
Example:
To get DAM image url
Example:
Note: Read more about attribute optimizer following this LINK
Require:
Configuration of your application in Shopify
Installing the Product Webhook
To import multiple images you need to follow the document of Shopify: https://help.shopify.com/en/manual/products/import-export/using-csv#adding-multiple-product-images
Copy the image URL in the Hub and paste the URL to the column Image Src in the CSV file. After that, you can use the function "Import" on the Products page to update the product with your CSV file.
Example file:
When Shopify import is done, the DAM webhook will convert the image links from Shopify CDN to DAM CDN link.
Nginx
PM2
Nodejs > v16.10.0
Certbot
To install the DAM module, please follow the steps below:
2. Upload and unzip to the server at your domain path (Ex: /var/www/public_html/)
3. Configuration Commercetools & DAM plugin (Read 2. Configuration)
4. Go to the source folder and run "npm install", "npm run build" (this command will build and create a folder public)
5. Go to the folder public and run "pm2 serve --spa".
6. Config your domain, port you will run with Nginx and create SSL with Certbot For example, config with port 8080:
Get the applicationId and entryPointUriPath of Commercetools (Read here)
Configure the DAM module as follow:
For Commercetools project:
Clone file custom-application-config.example.mjs and rename to custom-application-config.mjs
Input your Commercetools configuration
Set your entryPointUriPath at src/constants.js
For the DAM module:
Clone file filerobot-config.json.example in folder "src" and rename to filerobot-config.json
Input your DAM token, SEC, upload directory, and any other options as fitting.
In left-menu, select Scaleflex DAM > Products
In this page select your product variant need to upload/update image
To add new image, click on "Add Image" in view page Variant Detail
Select an image on the widget and click on "Insert" button to add the image.
Note: You can select multiple images.
Please note that the plugin will make some changes in the Admin section.
Currently, the plugin only supports the Text Component in Page Builder; other components will be supported in future versions.
TinyMCE Image (Insert/Edit) default function will be disabled. You can change the image size by scaling (drag and drop function) or delete it and add a new one with the size you like;
The plugin will disable the default upload function in Product Edit Page. Instead, every asset will be managed by DAM (single source of truth).
The plugin works well with the Magento Luma default theme. If you use a different theme, please check the manual integration below to get the product images.
You can register for a demo if you don't already have a DAM account.
Prerequisites
DAM supports Open Source and Commerce Edition from version 2 onwards.
If you have a question or need assistance, feel free to contact our support.
Install with Composer
To be able to install the module by Composer, you need to get a copy of the module on the Magento Marketplace, or directly from Github. Then, unzip the source code to app/code folder.
Enable and install the following modules in Magento:
php bin/magento module:enable Scaleflex_Filerobot php bin/magento setup:upgrade php bin/magento setup:static-content:deploy
Configuration
Once the steps listed above are completed, you need to enter your DAM token and security template into the DAM module configuration in the Magento admin interface: Stores > Configuration > DAM By Scaleflex > DAM integration.
If your token and security template id is verified, please activate the module by selecting Yes in the DAM Enable dropdown then save again.
After all is done, you will be asked to flush your Magento cache.
You will not be able to activate the plugin until the token and security template id are correct.
Configuration options
DAM Token: Your DAM token from the Asset Hub interface;
Security Template Identifier: Security template ID, found in the Project > Access > Security templates (tab) menu;
DAM upload directory: This is the top storage folder for your assets. The default value is /magento.
Please create the folder in DAM first to prevent an error. If you want to change it, you need to check if the folder exists in your DAM container.
Please click on Icon DAM on TinyMCE:
Then choose which images you want to insert -> transform:
You will be able to select and insert one or more images:
If you want to change the image size, please choose one image at time and click Insert. After that, you will be able to set the desired image dimensions.
If you want to change the dimensions of an already inserted image, you can use Tinymce Image size drag and drop.
Go to Product Edit Page in Images and Video Tab, then click Image Manager. Then you can use the file manager like TinyMCE above.
Make assets housed in Scaleflex DAM available to the Uniform asset library by adding this integration.
Get connection settings
Log into Scaleflex DAM Hub.
Note Container Id string to the left from your account icon at the top right corner. You will need this value in the next section.
Click on the Settings icon top right corner of the screen.
Scroll to the tab Project section.
Click on Access ink.
Create a new template in the Security templates tab if not created yet.
Note the Secret Key of your template. You will need this value in the next section.
Add integration
In Uniform, open your project.
Navigate to the Integrations tab.
Scroll to the section Browse Integrations.
Click Scaleflex DAM.
Click Add to project.
add-project
Enter the required values:
Container Id
Your DAM container id (aka token).
Security templates secret key
Security templates are meant to be used by frontend applications calling the DAM API directly or via the Media Asset Widget.
Click Save.
After you install the Scaleflex DAM integration, new asset library becomes available.
You can manage your Scaleflex DAM assets from inside Uniform. Uniform leverages its Media Widget to provide access to your library throughout your project.
You can insert assets directly into your Uniform Canvas components using asset parameters.
images
Resize - set the maximum width and height for the image to be resized after upload.
Edit image - crop; adjust the brightness, contrast and other attributes; add filters; draw on the image; or add watermarks.
videos
You can change the resolution automatically or to fit a specific device type (desktop, mobile, tablet, etc.)
Transcode - generate HLC manifest files for adaptive streaming.
any type
Rename - by clicking once on the filename or selecting Rename from the context menu
Manage details - by choosing the Manage option from the context menu.
Add metadata - by pressing the Fill metadata button.
Remove the file - cancel upload of the file
Add more files for upload
Successfully uploaded
See Manage assets to continue
Failed to upload
Remove the file
Retry the upload
Duplicate detected (see Storage for possible system policies on duplicate detection)
Remove the file
Show file location (only available if the Duplicate policy is set to Override)


Assets can be filtered by their creation or last modification date using pre-defined or custom time frames
With the format filter, user can choose from a list of asset types or file formats depending on the content of the DAM container
Filtering by filesize by entering a size range
This option allows user to filter by selecting one or more tags in the container
The metadata filter allows user to select multiple metadata fields as well as multiple values for each field and apply them as filters
The image group of filters lets user filter by image dimensions/resolution, contents, color or aspect ratio
A new filter called "Products" has been added to the search bar, allowing users to filter results based on the product_ref field. This feature lets users search for multiple product values at once and easily combine product references with any other metadata filter or grouping.Users must go to the Preferences section under the Project tab and toggle the Products Filter setting to enable this filter. Once enabled, the "Products" filter will be available for use in the search bar.

DAM Pabbly integration
Pabbly connects more than 800+ software products for seamless real-time data transfer. Their simple integration platform allows anyone to seamlessly integrate DAM with other applications to automate workflows.
You can if you don't have a DAM Account.
After logging in DAM, you need to login to Pabbly Connect.
In the Actions seaction, search for Filerobot by Scaleflex.
Choose Action Event or Trigger Event from the drop down input and confirm with Connect:
You can find your token and the API key in DAM Asset Hub: Developers / API Secret Keys.
Once you save your Token and API key, you don't need to enter it again for another action event by selecting "Select Existing Connection" option.
Triggers are events that occur in DAM and that events data are sent to Pabbly. DAM Pabbly connector has the following triggers:
DAM Pabbly connector has the following actions and corresponding inputs:
Security templates let you control how and from where your assets can be accessed.
The Security templates ensure that only authorized users or apps can upload, download, or list files, with optional limits like time, IP address, or session length.
They are used to generate SASS Keys, which are temporary API access keys with configurable permissions and restrictions. Please refer to our for steps on generating a SASS Key.
The Security Templates are accessible from .
Manage asset's approval status
{
"token": "token",
"secTemplate": "your_security_template",
"dir": "/base_directory"
}{%- assign fr_metafields = product.metafields.filerobot_galleries -%}{% render 'filerobot-image-tag', media: media.preview_image, metafields: fr_metafields, class: '', width: 1100, height: 1100, sizes: '(min-width: 750px) calc(100vw - 22rem), 1100px', media_id: media.id %}<img src="{%- render filerobot-url', media: media.preview_image, metafields: fr_metafields, optimizer: '?grey=1&width=500&height=500' -%}">foreach ($banner_images as $key => $value) {
foreach ($value as $banner_image) {
if (strpos($banner_image['image'], 'filerobot')) { // Check if image URL contain "filerobot"
$data['banner_images'][$key][] = array(
'title' => $banner_image['title'],
'link' => $banner_image['link'],
'image' => $banner_image['image'],
'thumb' => $banner_image['image'] . '&width=100&height=100', // return with dimensions
'sort_order' => $banner_image['sort_order']
);
} else {
if (is_file(DIR_IMAGE . $banner_image['image'])) {
$image = $banner_image['image'];
$thumb = $banner_image['image'];
} else {
$image = '';
$thumb = 'no_image.png';
}
$data['banner_images'][$key][] = array(
'title' => $banner_image['title'],
'link' => $banner_image['link'],
'image' => $image,
'thumb' => $this->model_tool_image->resize($thumb, 100, 100),
'sort_order' => $banner_image['sort_order']
);
}
}foreach ($banner_images as $key => $value) {
foreach ($value as $banner_image) {
if (strpos($banner_image['image'], 'filerobot')) { // Check if image URL contain "filerobot"
$data['banner_images'][$key][] = array(
'title' => $banner_image['title'],
'link' => $banner_image['link'],
'image' => $banner_image['image'],
'thumb' => $banner_image['image'] . '&width=100&height=100', // return with dimensions
'sort_order' => $banner_image['sort_order']
);
} else {
if (is_file(DIR_IMAGE . $banner_image['image'])) {
$image = $banner_image['image'];
$thumb = $banner_image['image'];
} else {
$image = '';
$thumb = 'no_image.png';
}
$data['banner_images'][$key][] = array(
'title' => $banner_image['title'],
'link' => $banner_image['link'],
'image' => $image,
'thumb' => $this->model_tool_image->resize($thumb, 100, 100),
'sort_order' => $banner_image['sort_order']
);
}
}FILE_MOVE
Move file
FILE_DELETE
Delete file
FILE_SET_VISIBILITY
Set file visibility
FILE_LABEL_CHANGE
Update file labels
FILE_IMAGE_EDITOR
Edit file
DIR_CREATE
Create directory
DIR_RENAME
Rename directory
DIR_META_CHANGE
Create and update directory metadata
DIR_MOVE
Move directory
DIR_DELETE
Delete directory
DIR_SET_VISIBILITY
Set dir visibility
CONFIG_CHANGE
Change container configuration
CONFIG_LIST
List container configuration
FILE_PRODUCT_CHANGE
Change product information
FILE_PROCESS_AUTOTAGGING
Perform autotagging
COLLECTIONS_LIST
List collections
COLLECTIONS_MANAGE
Manage collections
LABELS_LIST
View labels
LABEL_MANAGE
Manage labels
OBJECTS_SHARE_MANAGE
Manage sharebox
OBJECTS_AIRBOX_MANAGE
Manage airbox
OBJECTS_APPROVAL_MANAGE
Manage approval
OBJECTS_APPROVAL_VOTE
Approve/Reject assets
ACCESS_READ
View accesses
ACCESS_MANAGE
Manage accesses


DMO
VXP Viewer
The Viewers have no access to any System Settings.
They have restricted permissions for viewing and sharing data within in the DAM. They can only see:
Home
DAM (Assets, Folders, My favorites, and Sharebox only)


Folder Delete
Delete folder in DAM
Folder UUID
Folder Rename
Rename folder in DAM
Folder UUID,Folder new name
Folder List
Lists all folders details
(N.A.)
File Upload
It is fired when a new file is uploaded to Filerobot.File details are sent.
File Upload
Used to upload remote hosted files to DAM
Origin File Url,File name
File Delete
Delete file from DAM
File UUID
File Rename
Used to rename file.
File UUID,File new name
Folder Create
Create new folder in DAM.
Folder path
Security Templates can be created with the +Add Template button by entering the following information
Used to identify the security template
Used to define what users can / can't do with the assets. Permissions are selected from the list:
OBJECTS_LIST
List assets
OBJECTS_FETCH
Fetch assets
FILE_UPLOAD
Upload file
FILE_META_CREATE
Create file metadata
FILE_META_CHANGE
Update file metadata
FILE_RENAME
Rename file
These settings set limits on the Upload API.
Limit per min (limit_per_min)
Set the maximum uploads per minute with the key
Unlimited
Limit per source IP (limit_per_source_ip)
Maximum number of uploads allowed by IP by the key
Unlimited
Directory scope (dir_scope)
Directories where the key is allowed to upload. If you want to allow all subdirectories of a /folder, set the value to /folder/*
All directories
Restrict IP limitation
It restricts API calls based on IP address ranges and/or countries.
Whitelist IP ranges (whitelist_ip_ranges)
IP addresses allowed to perform requests using this SecurityTemplate
No restrictions
Whitelist countries (whitelist_countries)
If the IP address is detected to come from these countries, they are allowed to make requests to the system
All countries are allowed
This setting allows to set the validity period of the key, for example to match the user's session length in your authenticated application
expiration_duration
time in seconds before the key expires
1200 s (20 minutes)
Directories where the key is allowed to list elements.
directory_scope
Directories where the key is allowed to list and search assets. If you want to allow all subdirectories of a /folder, set the value to /folder/*
All directories
Once created, the Security templates can be activated, deactivated, or deleted. Bulk actions are available for managing multiple templates at once.
Description
To identify the Security template
Secret key
The Security Template value. To be kept secret
Created at
The Security Template creation date
Scope
Used to limit the scope. Value "project" by default.
Active
The Security template status that can be toggled from activated to deactivated using the ... options
Copy
Copy the secret key in the clipboard for easy reuse
Gaining consensus for social media posts or web assets.
Streamlining multi-department approvals for promotional materials.
Any asset can be submitted for an approval. "Approval" can adopt whatever definition your project needs, e.g. "Approval for website use".
Approvals must first be enabled for your project, which can be done by any user having access to Settings > DAM > Automations > Workflows:
An asset, requested for an approval, can have these statuses:
Pending
Waiting for votes
Approved
The asset has passed approval criteria and is fit for use*
Rejected
The asset has failed the approval criteria and is not fit for use*
Cancelled
When a Requester (or user with the necessary permission) has explicitly cancelled the request
Reset
When someone has edited the file and created a new version during an active approval request
*see Approval vote outcome section below
An approval request is considered:
Approved: When all approvers vote positively.
Rejected: When at least one approver votes negatively or the request Due date expires.
If an asset is rejected, the requester can review comments, make adjustments, and submit a new approval request.
If an approval is not approved by the due date, the approval is automatically rejected.
An approval can be requested in several ways:
From the Context menu > More actions > Manage approval
From the Library sidebar - expand the Approval status section and click the Manage approval link
From the Asset details window - go to the Approvals tab and click Request approval.
Click the Request approval button to open the Request approval modal.
Complete the following fields:
Selecting approvers: Choose one or more approvers. Users without asset access are muted and cannot be selected. At least one approver is required to enable the Send request button.
Adding an optional message: Provide additional context for the approvers (eg. "Please review this image for use in next month’s newsletter").
Setting a due date: Set a realistic deadline for the review process. The local time is auto-detected.
Once the Send request button is clicked, all approvers receive an alert.
Approvers will get a notification when they are asked to vote on a request. An approver can click on the link in the notification or navigate manually to the asset. Once in Asset details window > Approvals tab:
Click on the View and approve link
Then choose to either Approve or Reject the asset
You can leave comments when voting, in this way providing immediate feedback like: "Please adjust the font size in the banner."
Active requests can be modified by the original requester or anyone with the necessary permissions (if not listed as an approver).
Open the Approvals tab in the Asset details window.
Click Manage approval to view details.
Make changes as needed:
Cancel: Notify approvers and stop the approval process.
Edit: Modify approvers, due dates, or messages.
Regular users can view approval details but cannot take action or leave comments.
The approval status is displayed in the following locations: 1. Asset thumbnails - Approval status is displayed on the top-right corner (not clickable).
2. Library sidebar - a field in the General tab shows the approval status. Hovering over it displays a summary tile.
Approvals tab - Provides a detailed history of all approval requests.
Open the Approvals tab in the Asset details window.
Click History to view previous approval requests.
Select the file version from the left panel and click View details for more information.
Use clear messages to explain the purpose of the approval.
Set realistic due dates to allow stakeholders enough time to vote.
Regularly review approval history for process insights.


DAM Sylius plugin
Register for a demo if you don't already have a DAM account.
Open a command console, enter your project directory and execute the following command to download the latest stable version of this bundle:
This command requires you to have Composer , as explained in the installation chapter of the Composer documentation.
Then, enable the plugin by adding it to the list of registered plugins/bundles in config/bundles.php file of your project:
To configure the DAM Sylius plugin, the following components need to be updated:
1. DB Schema
Copy
2. Admin route
Create file in config/routes/scaleflex_sylius_filerobot.yaml with the following content:
Copy
3. Product media tab form
Change form theme {% form_theme form '@ScaleflexSyliusFilerobotPlugin/Admin/Form/imagesTheme.html.twig' %} in your templates/bundles/SyliusAdminBundle/Product/Tab/_media.html.twig
Copy
4. Product grid thumbnail
Change grid thumbnail column template
5. Script
6. Config filter
Create a file config/packages/scaleflex_filerobot.yaml and add content bellow
7. Update configuration in Admin
Navigate to Configuration / Scaleflex DAM
You can enable the plugin only if both token and security template id are correct.
Activation: Enable/Disable the plugin
DAM Token: Your DAM token, unique DAM Project and gallery identifier
Security Template Identifier: Your security template ID, found in the "Access > Security templates" section of your DAM admin
DAM upload directory: (sub)folder path to your asset's gallery, eg. /my_sylius_folder
The DAM plugin offers various Twig methods and filters to assist developers:
is_filerobot(image_path): Twig function which checks if an image is stored in DAM ;
image_path|filerobot('sylius_shop_product_thumbnail'): A resizing Twig filter; More filters can be added in in config/package/scaleflex_filerobot.yaml.
and in Twig
We have some default size follow Sylius default, you can override it in filter config ab
If you use Scaleflex DAM on existing File you have to check the path is filerobot or not, if not use the default way
Example with Sylius default
templates/bundles/SyliusShopBundle/Product/_mainImage.html.twig
templates/bundles/SyliusShopBundle/Product/Show/_mainImage.html.twig:
Scaleflex DAM x Directus extension
if you don't already have a Scaleflex DAM account.
Need to add a config CONTENT SECURITY POLICY to your .env file
Marketplace:
NPM Install:
Click on "Settings" on the left menu and after that click "Extensions" on the sub-menu.
Click "Settings" on the left menu and then click "Settings" on the sub-menu.
Scroll to block Modules and check two items "Scaleflex DAM Settings" and "Scaleflex DAM"
Token: Enter your Scaleflex DAM token here (eg: abcdefgh).
Security Template: To load the Scaleflex DAM Widget, you must create a Security Template in your Scaleflex DAM Hub.
Root directory: The directory in your Scaleflex DAM account, where the files will be stored.
TinyMCE Key: API key required for TinyMCE when using it with DAM, Here’s a guide on how to get the key:
Advanced Configuration
CNAME: Enter the CNAME as configured in your Scaleflex DAM Hub interface, once validated and the SSL certificate accepted. (Or leave blank if none). Note: To use the CNAME, you need to add your domain to the environment variable CONTENT_SECURITY_POLICY_DIRECTIVES__IMG_SRC and CONTENT_SECURITY_POLICY_DIRECTIVES__MEDIA_SRC in your Directus instance.
Example value: assets.yourdomain.com
Limit: The maximum number of files that can be added to a single field, default: 0 (unlimited).
When create new field with DAM Assets please choose Scaleflex DAM
There are some configurations:
Please aware that these configuration will override default configuration in Setting Page.
1/ Create a new field "Scaleflex DAM"
2/ Select your display type
On the list fields, select the new field just created. On the tab "Display", choose "DAM Assets".
3/ Go to your content Model and you will see the new field just created. Click on "Browse Assets" to select the assets in Scaleflex DAM
The result displayed after adding the assets
You can modify the image by clicking on "Show variants" to resize or crop the image.
In the list of items
You can set the limit asset showing in the list of items.
In the Field Settings, click on the tab "Display" and choose DAM Assets. Input the limit items you want to show in the list.
And the last thing, you can configure your variants asset in the tab "Interface". For example:
1/ Create a new field "WYSIWYG with Scaleflex DAM"
2/ Using the editor, click on the button "DAM" to add the asset to your content.
Support image, video, and audio.
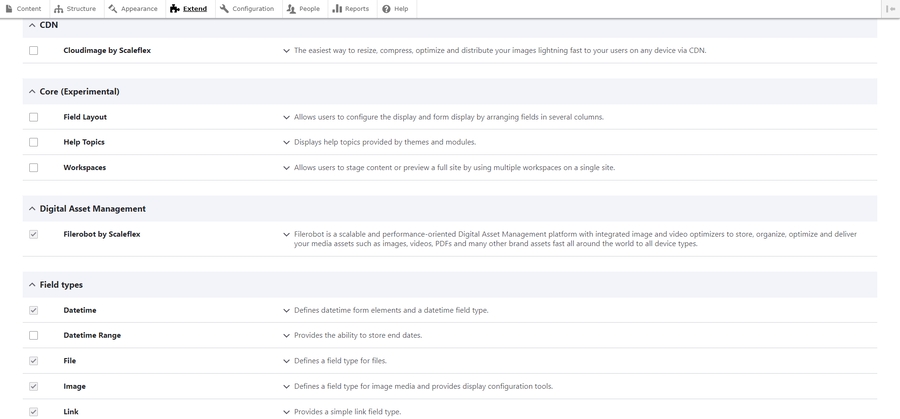

The WordPress VXP plugin: All-in-One Digital Asset Management and Cloudimage Acceleration.
The WordPress VXP plugin is a powerful WordPress addition designed to help businesses efficiently manage and optimize their digital assets. Integrating Scaleflex two key products in one - Digital Asset Management (DAM) and Cloudimage (Digital Media Optimization) - it enables you to store, organize, deliver, and optimize images, videos, and other digital resources directly from within WordPress.
The Contentful DAM App allows users to seamlessly integrate and manage digital assets (images, videos, and documents) from Scaleflex DAM within the Contentful CMS. With support for multiple file types
FILE_MOVE
Move file
FILE_DELETE
Delete file
FILE_SET_VISIBILITY
Set file visibility
FILE_LABEL_CHANGE
Update file labels
FILE_IMAGE_EDITOR
Edit file
DIR_CREATE
Create directory
DIR_RENAME
Rename directory
DIR_META_CHANGE
Create and update directory metadata
DIR_MOVE
Move directory
DIR_DELETE
Delete directory
DIR_SET_VISIBILITY
Set directory visibility
CONFIG_CHANGE
Change container configuration
CONFIG_LIST
List container configuration
FILE_PRODUCT_CHANGE
Change product information
FILE_PROCESS_AUTOTAGGING
Perform autotagging
COLLECTIONS_LIST
List collections
COLLECTIONS_MANAGE
Manage collections
LABELS_LIST
View labels
LABEL_MANAGE
Manage labels
OBJECTS_SHARE_MANAGE
Manage sharebox
OBJECTS_AIRBOX_MANAGE
Manage airbox
OBJECTS_APPROVAL_MANAGE
Manage approval
OBJECTS_APPROVAL_VOTE
Approve/Reject assets
ACCESS_READ
View accesses
ACCESS_MANAGE
Manage accesses


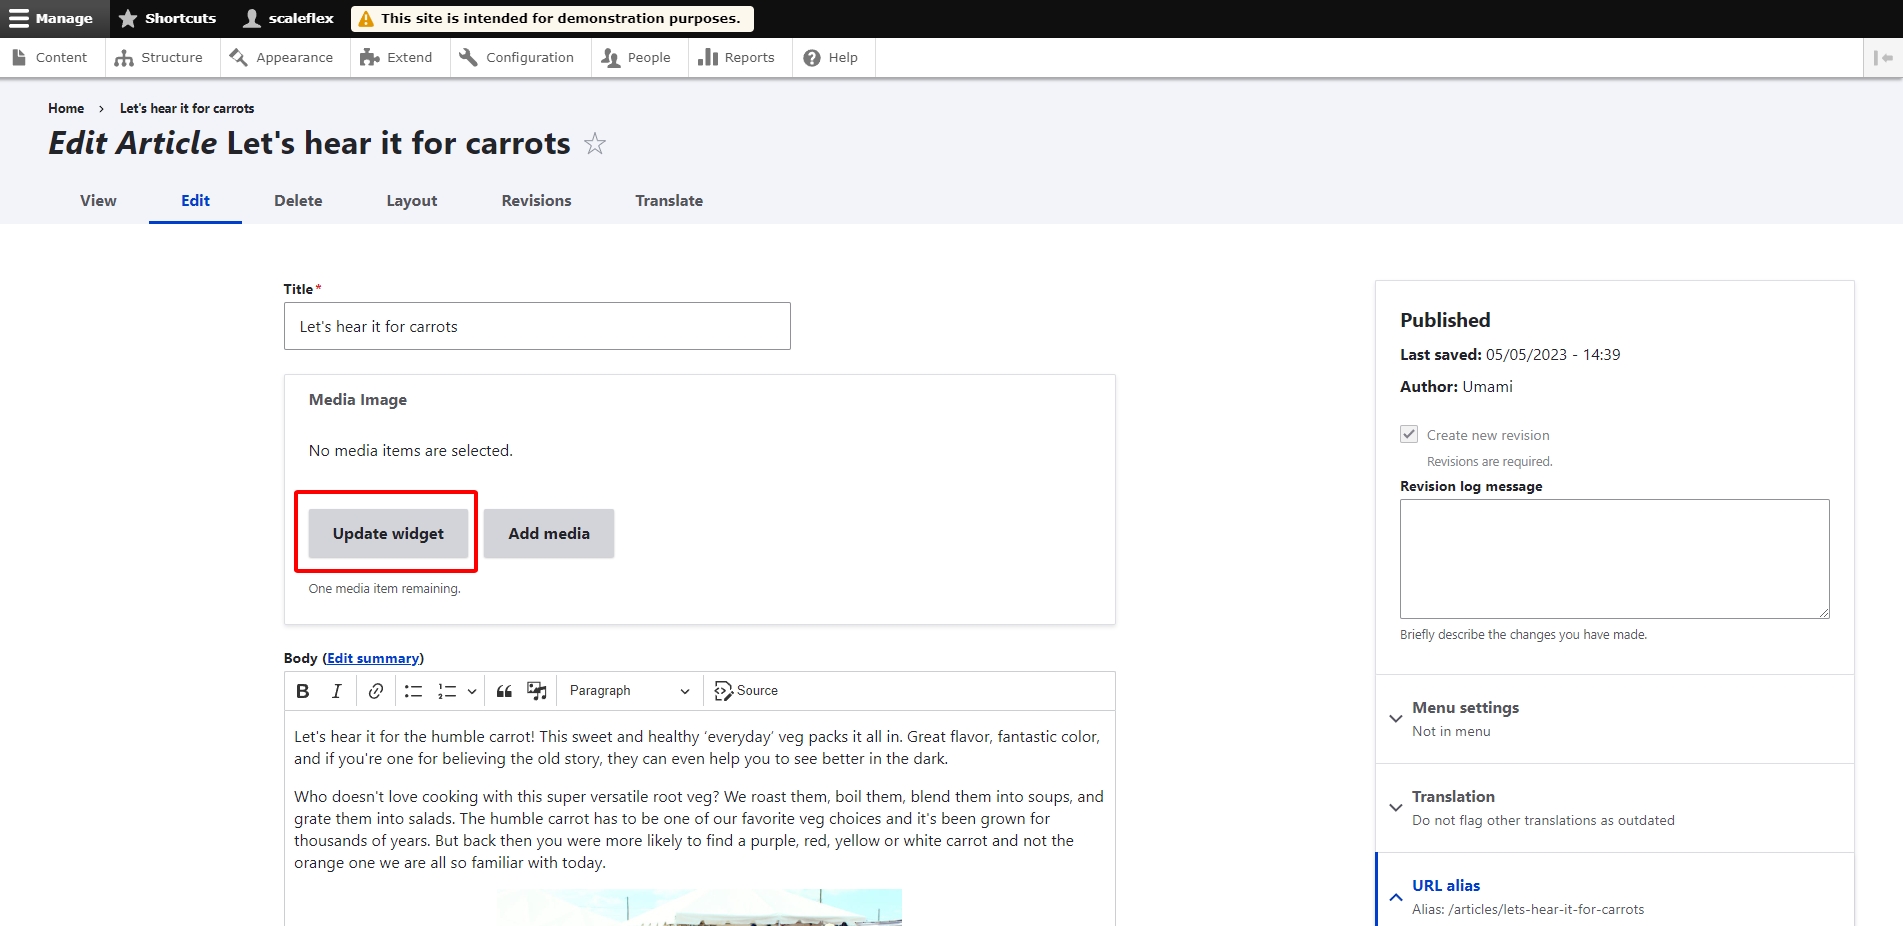

Attributes: Attribute from Scaleflex DAM asset that you want to include in the Client response.
Limit Type: File types are limited when using the Widget.
Attribute from Scaleflex DAM asset that you want to include in Client response.
Limit Type
File types are limited when using Widget.
Limit
The maximum number of files that can be added to a single field, default: 0 (unlimited).


Attributes
Cloudimage (Digital Media Optimization): Automatically optimize images and videos for size and loading speed, enhancing user experience and improving website performance.
To use this plugin, ensure you have a Scaleflex DAM account (register for a demo if not already) or a Cloudimage account (register to get direct access if not already).
Log in to your WordPress admin panel.
On the Admin sidebar, navigate to Plugins > Add New
Enter "Scaleflex VXP" in the search field and then install the plugin
Once installed, click Activate.
Navigate to the settings page.
Select "Digital Asset Management (DAM)".
Fill in the plugin settings page with the required authentication details
Token: Your token from the DAM
Security Template: A key for obtaining time-limited access tokens (used for API interaction). See: Security templates. Behind the scenes, the code would use the Security Template Identifier to obtain a SASS (the “limited-time password”). The SASS would then be used in the auth header for interacting with the Filerobot API (https://developers.scaleflex.com/)
Base folder in the DAM to synchronise assets to / from: Choose the folder where uploaded assets should be stored in the DAM platform.
With Scaleflex DAM, we have two modes of visualization:
DAM-Native: Compatibility with every version of WordPress and easy to use with other plugins
DAM-Widget: Supports Gutenberg (with classic blocks), Classic Editor, Yoast SEO, WooCommerce, and Advanced Custom Fields. Any other Editor or plugin using media should be validated before use.
Storage location: Where assets will be stored. In any case, WordPress will use optimized asset links from the DAM to display and accelerate assets in WordPress.
DAM Only: activating the plugin uploads existing WordPress assets to the DAM; new assets are stored only in the DAM and require manual syncing after deactivation.
DAM and WordPress: assets are duplicated between WordPress and the DAM; deactivating the plugin relinks URLs to local WordPress storage.
Maximum asset weight: in order to prevent timeouts or save space on the WordPress server, you can limit the weight of assets that will be also saved to the WordPress server. Limiting the size will also make larger files unavailable in your posts or pages if you remove the Scaleflex plugin.
Synchronize all assets from DAM to WordPress:
Once enabled, the feature pulls DAM assets directly from the Scaleflex DAM into WordPress (without DAM metadata), simply making assets available and searchable by their name.
Still, a DAM metadata needs mandatorily to be selected to synchronize the attachment ID from WordPress to DAM in order to maintain unicity in WordPress database.
If you don't have any, please create one at: https://hub.scaleflex.com/settings/dam/metadata/assets
This custom metadata should be of type number and should not be edited by DAM users. The selector will pre-filter the available metadata for that purpose.
You can enable this option if you want to use metadata in your project or synchronize the asset when you have a new upload from DAM.
Once enabled, the feature pulls DAM metadata directly from the Scaleflex DAM into WordPress (both default and custom metadata), also enabling advanced search and description capabilities.
New assets uploaded to the DAM (from the specified base folder) will be automatically synced to WordPress via Webhook, this time regardless of whether they are used in pages or posts.
You can select to synchronize the relevant DAM metadata you want with Title, Description, Caption, and Alternative Text (ALT) as standard WordPress metadata.
For this to happen, the only metadata needed for the WordPress to pull each and all of the DAM Asset's metadata is the file UUID .
Example for Webhook URL:
🔐 IMPORTANT — Application Password Required
To ensure that the webhook works correctly, you must use a WordPress Application Password for authentication.
Application Passwords allow secure REST API access without exposing your main account password and prevent unauthorized webhook calls.
How to Create an Application Password in WordPress
Step 1: Go to Users > Profile (or “Your Profile”).
Step 2: Scroll down to the Application Passwords section.
Step 3: Enter a name for the new password, for example:
Step 4: Click Add Application Password. WordPress will generate a password — copy and store it safely, as you will need it when configuring the webhook in the DAM settings.
Step 5: Make sure your "Permalink" setting is of the correct type
Go to WordPress → Settings → Permalinks → select any other than "Plain" and save
For example, before DAM is installed and activated, you have these 2 images on your WordPress CMS and these 2 images on your DAM platform:
At this point, the images' URLs still have WordPress CMS URLs
After you install, activate, and configure DAM, you can see the notification at the top to confirm if you entered the correct credentials.
Then the synchronization will run in the background and upload your current asset into Scaleflex DAM.
You can check the progress synchronization at the "Report" page
Now you can see that all the images' URLs have become DAM URLs
The next major feature that Scaleflex DAM brings is the Media Asset Widget as Media Library
Here you can upload your media assets to the DAM platform (instead of WordPress local library)
Note: This feature supports natively Gutenberg, Classic Editor, Yoast SEO, WooCommerce, and Advanced Custom Fields (with others to be added soon).
Anywhere the Media Asset Manager is called by an editor, a Scaleflex DAM media tab will be visible.
When you deactivate the plugin, all media assets that have been synchronized to the DAM will not be available anymore as "CDN links".
You have two options when deactivating the plugin, and what happens next will be depending on the one chosen:
Delete all plugin data
this option revoves all configuration parameters and CDN links from the Wordpress database
if you selected for storage "DAM only":
all articles (and other posts) will then have broken images unless they are manually replaced
if you selected for storage "DAM and Wordpress":
a background process will map and assign all available local media to articles (and other posts)
Keep all plugin data
this option simply removes the plugin from the active ones, and does not modify the articles links
Multiple File Type Support: Supports a variety of file types, including images, videos, and documents.
Metadata configuration:
Asset metadata from Scaleflex DAM will show on your Rest/GraphQL response
You can choose which attributes will be saved in Contentful content field
Configuration for limited file types and maximum file count
Register for a demo if you don't already have a DAM account.
Sign up to Contentful.
Contentful is 100% Cloud Native, so you have to sign up for a hosted CMS at https://be.contentful.com and you will get a link to your space:
There are 2 ways:
To install the Contentful DAM App, visit the Contentful Marketplace and click 'Install'. Follow the prompts to complete the installation.
Configuration keys(* = required):
Token*: This is the Scaleflex DAM token found in the Asset Hub interface, which allows the app to connect to your DAM account
Security Template*: Found in the Project > Access > Security Templates tab, this key is required for secure access
Asset directory: Defines the top-level folder for storing assets. The default is the root directory (/).
Limit: The max number of files that can be added to a single field
Attributes: A string containing information (JSON attributes) that you want to store in a Contentful field, separated by commas. For example: meta, info.
Limit Type(s): String type, acceptable values: any or all of the following: 'image', 'video', 'audio', 'application', 'application/zip', 'application/x-zip-compressed', 'application/vnd.rar', 'application/x-rar-compressed', separated by commas.
In any content model, create a new JSON Object Field
In Appearance section, choose Scaleflex DAM
In any Scaleflex DAM Field, to insert assets from DAM to content, click on Asset Manager
An Asset Dialog will appear:
Select one or more assets you want to add to the field.
Click "Insert" on the top right corner of the opened Dialog
You have 2 options:
Insert as original
Insert as transformed (change the image format or size before inserting)
After inserted, assets will appear like below:
You can:
Reorder assets position by drag and drop
You can delete unwanted asset(one by one - click on the 3 dots icon ... then select "Delete") or click "Clear all" to remove all selected assets
If any changes are done from the Hub, please use "Refresh Assets" button so to update Contentful
The following is an example of how metadata for inserted assets is stored in JSON format within Contentful.


Update metadata for multiple files at once by uploading a CSV. Learn how to structure your file, which fields are supported, and how to validate changes before applying them.
This feature allows you to update the metadata of multiple files in bulk by importing a CSV file. It is useful when you need to edit tags, titles, descriptions, or custom fields across many files quickly.
Editing metadata via CSV is useful in the following cases:
bulk metadata assignment after upload of multiple files
correction of any metadata mistakes across multiple assets
renaming multiple files
moving multiple files to a new folder as an alternative to the standard "Move" action from the context menu
a software tool for editing CSV files (Excel, Google Sheets, Numbers, etc)
to edit the assets metadata in the relevant folder
get to know
read the section about
The CSV (Comma-Separated Values) file is a format that may contain comma (,), semi-colon (;) or pipe (|) as a column separator.
The "Edit via CSV" feature works when comma is used as a delimiter.
Some software tools for editing CSV files tend to overwrite the default column separator. It means that the initial file might be downloaded as comma-separated, but after saving the changes, the tool may convert it to a semicolon-separated file. These files may cause issues. DAM will likely reject them during upload.
Steps how to troubleshoot such problems, if they appear on your device, are described in
First, you need to select the files that require editing. They can be:
the content of a specific folder - in this case, go to Folders view and navigate to the target folder. Then open the context menu and choose "Edit files via CSV"
the files uploaded in a specific period, files that contain a specific value in a metadata field, files with a specific label, My favourites, etc - in this case, apply the corresponding filters in the Assets view in order to get only the files that require changes. Scroll to the bottom of the page to load all results. For large volumes of results (50+), lazy loading may be triggered, so you need to scroll to the very end of the results set. Click on "Select all visible files" and then choose option "Bulk edit via CSV"
Once the files are selected, download the CSV file containing their existing metadata.
As a general rule, it is good to review so to know what kind of values are expected in every field.
In case some metadata field is set with "Regional Variant: Languages", there will be a dedicated column for every language configured for the project.
Even if you modify some of the non-editable fields, DAM will not reflect the changes.
If you submit an invalid list option for the Single-select and Multi-select List custom fields, the CSV will be uploaded, but the value in these fields will become - (none)
Empty cells will not replace an existing metadata value in DAM.
Change in the folder's path of the asset would result in moving the file to the new location (and eventually creating a new folder if it does not already exist in the Folders structure)
A change in the filename would result in renaming the file.
The updated CSV can be renamed; however, its first line (the Headers row) should always remain unchanged.
Up to 50 000 assets can be updated in a single CSV file.
As a general rule, before attempting bulk edit of hundreds or thousands of metadata values and files, test the changes using a CSV with 1-2 records only. Inspect the results and ensure the updated metadata values match your intentions. This approach would protect you from inadvertently modifying a very large number of assets in a non-desired way.
Always save the edited CSV file as a new document and keep the original version of the downloaded CSV. In that way, if some mistake happens and some assets are unintentionally edited, you have a back-up and you can always upload the initial CSV and restore the initial metadata structure.
CONTENT_SECURITY_POLICY_USE_DEFAULTS: true
CONTENT_SECURITY_POLICY_DIRECTIVES__SCRIPT_SRC: "'self','unsafe-eval',*.scaleflex.com,cdn.tiny.cloud"
CONTENT_SECURITY_POLICY_DIRECTIVES__IMG_SRC: "'self',data:,blob:,https://raw.githubusercontent.com,https://avatars.githubusercontent.com,*.filerobot.com,*.tinymce.com"
CONTENT_SECURITY_POLICY_DIRECTIVES__MEDIA_SRC: "'self', *.filerobot.com"npm i @plugins_sfx/directus-extension-scaleflex-dam{
"variants": [
{
"code": "desktop",
"name": "Desktop",
"preset": {
"width": "200",
"height": "400"
}
},
{
"code": "tablet",
"name": "Tablet",
"preset": {
"width": "100",
"height": "200"
}
}
]
}https://yourdomain.com/wp-json/sfxvxp/dam/v1/webhook/listen-dataSFXVXP Webhookhttps://app.contentful.com/spaces/{Your Space ID}/home[
{
"url": "https://try.filerobot.com/Widget_demo_folder/%24R202RV2-AiiacoEg.jpg",
"id": "2a9de85c-406a-5101-9ab5-7b6259250005",
"name": "$R202RV2-AiiacoEg.jpg",
"extension": "jpg",
"type": "image/jpeg",
"attributes": {
"meta": {
"boolean": true,
"creator": "Hiep",
"date": "2024-09-11",
"dc_description": "dc description test",
"description": {
"en": "neweded"
},
"multi_select": [
"Blue",
"Green",
"Yellow"
],
"price": {
"default": "12"
},
"product_id": {
"default": "IIHHYTTD22"
},
"sport": "Sport test",
"test": "None",
"test-multi-select": [
"Test 2",
"Test 1"
],
"test-price": {
"eur": "20"
},
"testsd": "2024-09-10",
"title": {
"en": "testssssss"
}
}
}
}
] composer require scaleflex/sylius-filerobot-plugin<?php
# config/bundles.php
return [
// ...
Scaleflex\SyliusFilerobotPlugin\ScaleflexSyliusFilerobotPlugin::class => ['all' => true],
];bin/console doctrine:migration:diff
bin/console doctrine:migration:migrate
bin/console cache:clear# config/routes/scaleflex_sylius_filerobot.yaml
scaleflex_sylius_filerobot:
resource: "@ScaleflexSyliusFilerobotPlugin/Resources/config/routing.yaml"{% form_theme form '@ScaleflexSyliusFilerobotPlugin/Admin/Form/imagesTheme.html.twig' %}
<div class="ui tab" data-tab="media">
<h3 class="ui top attached header">{{ 'sylius.ui.media'|trans }}</h3>
<div class="ui attached segment">
{{ form_row(form.images, {'label': false}) }}
{{ sylius_template_event(['sylius.admin.product.' ~ action ~ '.tab_media', 'sylius.admin.product.tab_media'], {'form': form}) }}
</div>
</div># config/package/_sylius.yaml
sylius_grid:
grids:
sylius_admin_product:
fields:
image:
options:
template: "@ScaleflexSyliusFilerobotPlugin/Admin/Product/Grid/Field/image.html.twig"# config/package/sylius_ui.yaml
sylius_ui:
events:
sylius.admin.layout.javascripts:
blocks:
filerobot_script: '@ScaleflexSyliusFilerobotPlugin\Admin\filerobotScript.html.twig'# config/packages/scaleflex_filerobot.yaml
imports:
- { resource: "@ScaleflexSyliusFilerobotPlugin/Resources/config/filters.yaml"} scaleflex_sylius_filerobot:
filters:
custom_size: { width: 120, height: 120 } image_path|filerobot('custom_size') scaleflex_sylius_filerobot:
filters:
sylius_admin_product_large_thumbnail: { width: 550, height: 412 }
sylius_admin_product_small_thumbnail: { width: 150, height: 112 }
sylius_admin_product_tiny_thumbnail: { width: 64, height: 64 }
sylius_admin_product_thumbnail: { width: 50, height: 50 }
sylius_shop_product_tiny_thumbnail: { width: 64, height: 64 }
sylius_shop_product_small_thumbnail: { width: 150, height: 112 }
sylius_shop_product_thumbnail: { width: 260, height: 260 }
sylius_shop_product_large_thumbnail: { width: 550, height: 412 }
sylius_small: { width: 120, height: 120 }{% if product.imagesByType('thumbnail') is not empty %}
{% if is_filerobot(product.imagesByType('thumbnail').first.path) %}
{% set path = product.imagesByType('thumbnail').first.path|filerobot('sylius_shop_product_thumbnail') %}
{% else %}
{% set path = product.imagesByType('thumbnail').first.path|imagine_filter(filter|default('sylius_shop_product_thumbnail')) %}
{% endif %}
{% elseif product.images.first %}
{% if is_filerobot(product.images.first.path) %}
{% set path = product.images.first.path|filerobot('sylius_shop_product_thumbnail') %}
{% else %}
{% set path = product.images.first.path|imagine_filter(filter|default('sylius_shop_product_thumbnail')) %}
{% endif %}
{% else %}
{% set path = asset('assets/shop/img/200x200.png') %}
{% endif %}
<img src="{{ path }}" {{ sylius_test_html_attribute('main-image') }} alt="{{ product.name }}" class="ui bordered image" />{% if product.imagesByType('main') is not empty %}
{% set source_path = product.imagesByType('main').first.path %}
{% if not is_filerobot(source_path) %}
{% set original_path = source_path|imagine_filter('sylius_shop_product_original') %}
{% set path = source_path|imagine_filter(filter|default('sylius_shop_product_large_thumbnail')) %}
{% else %}
{% set original_path = source_path|filerobot('sylius_shop_product_original') %}
{% set path = source_path|filerobot('sylius_shop_product_large_thumbnail') %}
{% endif %}
{% elseif product.images.first %}
{% set source_path = product.images.first.path %}
{% if not is_filerobot(source_path) %}
{% set original_path = source_path|imagine_filter('sylius_shop_product_original') %}
{% set path = source_path|imagine_filter(filter|default('sylius_shop_product_large_thumbnail')) %}
{% else %}
{% set original_path = source_path|filerobot('sylius_shop_product_original') %}
{% set path = source_path|filerobot('sylius_shop_product_large_thumbnail') %}
{% endif %}
{% else %}
{% set original_path = asset('assets/shop/img/400x300.png') %}
{% set path = original_path %}
{% endif %}
<div data-product-image="{{ path }}" data-product-link="{{ original_path }}"></div>
<a href="{{ original_path }}" class="ui fluid image" data-lightbox="sylius-product-image">
<img src="{{ path }}" id="main-image" alt="{{ product.name }}" {{ sylius_test_html_attribute('main-image') }} />
</a>
{% if product.images|length > 1 %}
<div class="ui divider"></div>
{{ sylius_template_event('sylius.shop.product.show.before_thumbnails', {'product': product}) }}
<div class="ui small images">
{% for image in product.images %}
{% set path = image.path is not null ? (is_filerobot(image.path) ? image.path|filerobot('sylius_shop_product_small_thumbnail') : image.path|imagine_filter('sylius_shop_product_small_thumbnail')) : asset('assets/shop/img/200x200.png') %}
<div class="ui image">
{% if product.isConfigurable() and product.enabledVariants|length > 0 %}
{% include '@SyliusShop/Product/Show/_imageVariants.html.twig' %}
{% endif %}
<a href="{{ is_filerobot(image.path) ? image.path|filerobot('sylius_shop_product_original') : image.path|imagine_filter('sylius_shop_product_original') }}" data-lightbox="sylius-product-image">
<img src="{{ path }}" data-large-thumbnail="{{ is_filerobot(image.path) ? image.path|filerobot('sylius_shop_product_large_thumbnail') : image.path|imagine_filter('sylius_shop_product_large_thumbnail') }}" alt="{{ product.name }}" />
</a>
</div>
{% endfor %}
</div>
{% endif %}


before editing metadata, review your team's metadata guidelines to ensure consistent usage of tags, titles, and values
(optional) get a text editing tool that allows you to open the CSV file as a simple text file - it is useful for troubleshooting purposes in case of any unexpected issues in the CSV processing
The CDN link where you can access the optimised, publicly available version of this file (no CDN link for Private assets and Folders).
Non-editable
Mime type
The MIME type of the file (jpeg, png, pdf, txt, etc).
Non-editable
Size
The asset's size in bytes
Non-editable
SHA1
The sha1 value of the asset. A unique identifier for the asset content.
Non-editable
UUID
The unique identifier of the asset in DAM.
Non-editable
Created at
The date when the file has been uploaded. In yyyy-MM-dd hh:mm:ss format.
Non-editable
Updated at
The date when the file has been edited for last time. In yyyy-MM-dd hh:mm:ss format.
Non-editable
Visibility
It could be:
inherited - sharing the same visibility settings as the ones of the parent folder.
public - visible to everyone.
private - restricted access.
Editable. Caution is advised to avoid exposing protected data or disrupting public asset delivery.
If Regional variants are enabled for your project and it has several Languages, each of these fields will appear in a separate column for each of the configured languages.
Booleans - accepts only true or false
List (single select) - only existing values are accepted. Invalid values will be replaced with "-" (none).
List (multiple select) - several values can be provided, separated by ; In the same way, like the rule for the Single-select lists, the value should already exist in the metadata structure.
Date - should be supplied in format yyyy-MM-dd
Tags - this kind of field accepts new values that may not currently exist in the project metadata structure. Supply the tag values separated by ;
As a good practice, always check if there is an existing variant for the tag value, so not to create duplicated tags and inconsistency in the project (for example, to have assets tagged with winter-campaign and another set of assets tagged with WinterCampaign )
Inspect the Numbers variant set for your device and set it to show the decimal numbers with a dot (.).
For Mac:
Open "System settings" -> "Language & Region"
Set the "Number format" to 1234567.89 (to use dot, not comma)
If not, please create it and save the changes.
After updating the field values, re-upload the CSV file.
Item type
Information if the record describes a FILE or a FOLDER
Non-editable
Path
File location in DAM.
Editing the folder path will move the file.
Editing the filename will rename it. Caution: Renaming or moving files may affect links, embeds, or published content that rely on the original location or filename.
Title
Title of the file(if any)
Editable
Description
Description of the file content (if any)
Editable

CDN Link


DAM Storyblok App
if you don't already have a DAM account.
Sign up to Storyblok.
You can find the Scaleflex DAM in the , clicking the Visit Website button will link to this page containing all instructions.
Note that requesting an installation delegation can be done via our or our support email , and finally using our regular .
Make sure you complete, in any case, each of the following steps fully:
Send us the installation delegation request, including
Your Storyblok "Space ID" (find it in the settings, in General / Space)
Your preference of installation type ( Field Plugin, or App level -default- )
Add (invite) our Plugins Installation team to your Space
Our support team will contact you back to confirm the installation date and make sure you have everything configured properly to start using the Scaleflex DAM plugin.
Once this is done, you will be able to find the new block in your "Block Library" under the name "DAM" and be ready to go!
Depending on your level of support and onboarding plan, a CSM can assist you for the next steps: setup and configuration.
You have 3 required configuration items to take from the Asset hub: Token (the unique project or library identifier), Security Template (this will be used as the secret for authentication), Directory (where you want Storyblok's assets to be stored and retrieved from, usually a dedicated sub-directory; note that this field must be comprised under the directory limit of the Security Template you have selected) And there are optional fields: limit, attributes
You can add as many blocks containing the DAM field type as needed. There is no limit on the number of blocks you can include.
Go to Block Library -> New Block
Enter any Technical Name you want, Select Nestable Block -> click "Add Block"
In the side modal "Edit [Technical Name]" that appeared, enter any name as Field (eg. DAM_Asset), then select the type of field as plugin -> click "Add"
Note: Show complete Metadata work if the token has the relevant permission. The list project configuration default shows the title and description.
Below are the 3 configuration steps illustrated:
New BlockNew Field TypeField Required SettingsField Optional Settings
Add New Block
In any Content, type Edit Page
Click Add Block, Choose the Block contain the DAM Field you want to add to the Page:
It is now possible to interact with your DAM library assets directly from Storyblok:
Scaleflex DAM (VXP) Akeneo App
You need an active DAM account. if you don't already have one;
Your Akeneo plan needs to be Enterprise Edition.
Log in to your Akeneo instance
Go to Connect - App store, search by name: "Scaleflex", App name: "Scaleflex DAM (Visual Experience Platform)"
Click Connect: You will be redirected to the Asset Hub where to select which token you want to use for your Akeneo instance
Each token can be used for only one Akeneo Instance
Multiple Akeneo instances can use the same token
After selecting your token and clicking Active, you will be redirected back to Akeneo, please grant all permission to Akeneo app
Check on EVENT PLATFORM
When activation done, you will be redrect to DAM Hub. You can choose go to Setting Page, or discover the DAM Hub.
Go to Setting / Automation / Integrations or use this link:
There are 2 sections:
Enable / Disable: If disabled, you cannot use the Akeneo sync feature on DAM
Default size: Default image size will be used if there are no configs related to each asset
Image resize technique:
Crop: Cut image part to resize
How does it work?
Can be duplicated
Priority: Bottom to top, and it will apply the first one match the setting, check example bellow.
Example:
An Asset with these information:
Scope: commerce / Locale: en_US / Family: filerobotmedia
Will try to match setting following the steps below:
First try: Type: Asset / Family: filerobotmedia / Scope: commerce / Locale: en_US
Second try: Type: Asset / Family: All Items / Scope: commerce / Locale: en_US
Flow guide
Select type, there are 4 types:
Global: Affects all assets including entity and asset
Asset: Asset Family
Entity: Entity Reference
Image resize technique: Fit or Crop
Size: Must follow format: width x height, example: 300x400
Addition subfix URL: append a suffix to asset URLs to enable transformations,
To enable PIM to DAM sync: When we update some attribute(check supported field type above) in a PIM record(Asset, Product), it will update the mapped metadata in DAM.
Go to Access to get an API Key: , please select All
Copy API Key and paste into Api key
Enable the Toggle button
Save changes
To sync from DAM to PIM by Metadata you have to copy and add to new Webhook Setting at:
Please follow these configurations:
Sync family options
You have to provide a valid API Key in PIM to DAM section to enable this feature.
To see these tabs, you have to enable feature on Metadata section
This mapping determines which asset attributes will be synchronized based on the product family.
Select Family
You can set Default attribute options in case all family have the same field. If you don't declare mapping for specific family, this attribute will be use by default.
Select attribute belong to Family
You can Edit and Delete
Go to any asset, at Metadata section click Edit
Enter family and code metadata which same in setting page
If you use Product Reference Component, Enter code on Product Section on top of Metadata tab
If PIM to DAM enabled, any update attribute(supported types) in Akeneo will update in DAM
It only update asset metadata when change attribute value in PIM if that asset is synced to an Asset or Product in PIM.
If one asset synced to multiple assets, products, the last one win.
Right click on any asset / More action / Sync to Akeneo
Choose Family or Entity, Product
Choose attribute
There are 4 cases that can happen:
Value per channel and value per locale are both false: Can sync without choose scopes or locales
Scaleflex DAM (VXP) Akeneo Connector
You need an active DAM account. if you don't already have one;
Akeneo instance
Prepare crendentials by go to Akeneo instance go to Connect / Connection settings
Create
Label: any
Code: any
Flow type: Data source
Go to Setting / Automation / Integrations or use this link:
Click on Enable Akeneo community
Enter credentials from Akeneo, then Validate and Save Change
After validated, you can change your credentials in Credentials Tab
Go to Setting / Automation / Integrations or use this link:
There are 2 sections:
Enable / Disable: If disabled, you cannot use the Akeneo sync feature on DAM
Default size: Default image size will be used if there are no configs related to each asset
Image resize technique:
Crop: Cut image part to resize
How does it work?
Can be duplicated
Priority: Bottom to top, and it will apply the first one match the setting, check example bellow.
Example:
An Asset with these information:
Scope: commerce / Locale: en_US / Family: filerobotmedia
Will try to match setting following the steps below:
First try: Type: Asset / Family: filerobotmedia / Scope: commerce / Locale: en_US
Second try: Type: Asset / Family: All Items / Scope: commerce / Locale: en_US
Flow guide
Select type, there are 4 types:
Global: Affects all assets including entity and asset
Asset: Asset Family
Entity: Entity Reference
Image resize technique: Fit or Crop
Size: Must follow format: width x height, example: 300x400
Addition subfix URL: append a suffix to asset URLs to enable transformations,
To enable PIM to DAM sync: When we update some attribute(check supported field type above) in a PIM record(Asset, Product), it will update the mapped metadata in DAM.
Go to Access to get an API Key: , please select All
Copy API Key and paste into Api key
Enable the Toggle button
Save changes
To sync from DAM to PIM by Metadata you have to copy and add to new Webhook Setting at:
Please follow these configurations:
Sync family options
You have to provide a valid API Key in PIM to DAM section to enable this feature.
This mapping determines which asset attributes will be synchronized based on the product family.
Select Family
You can set Default attribute options in case all family have the same field. If you don't declare mapping for specific family, this attribute will be use by default.
Select attribute belong to Family
You can Edit and Delete
Go to any asset, at Metadata section click Edit
Enter family and code metadata which same in setting page
If you use Product Reference Component, Enter code on Product Section on top of Metadata tab
If PIM to DAM enabled, any update attribute(supported types) in Akeneo will update in DAM
It only update asset metadata when change attribute value in PIM if that asset is synced to an Asset or Product in PIM.
If one asset synced to multiple assets, products, the last one win.
Right click on any asset / More action / Sync to Akeneo
Choose Family or Entity, Product
Choose attribute
There are 4 cases that can happen:
Value per channel and value per locale are both false: Can sync without choose scopes or locales


Use [email protected] (you can remove this user once the installation is completed)
with "Admin" role (otherwise the installation is not possible)
Click on the field just added (in the "General" section below), then scroll down to the Plugin Options, then choose "filerobot-storyblok" in the Custom Type drop-down. Add the 3 configuration keys you gathered from the DAM and set up like below:
token = Token from DAM (aka project identification code)
secTemplate = Security template from DAM
rootDir = Base directory (also in the security template configuration)
limit (optional) = number of files you can show when choose on DAM Asset
attributes (optional) = add more data on API Response Structure (ex: meta, tags, owner)
if "meta" is used, then all custom metadata will be sent along the asset's URL in the json,
if "meta[key1, key2, ...]" is used, only the metadata(s) specified in the list will be sent.
limitType (optional) = File Type Filtering ( ex: image, video, audio, application, application/zip, application/x-zip-compressed, application/vnd.rar, application/x-rar-compressed )
forceFilters (optional) = Advanced search metadata filters (feel free to contact us to confirm your use case so our support can provide the exact setting, adapted to your requirement)
Eg.. if you want to show only assets that have expired_date metadata field greater or equal today: you can use [{"key": "expired_date", "value": ["$CURRENT_DATE..", "EMPTY"]}]
disableTransformations (optional) = Allow usage of transformations before inserting into post (enable to add "insert as" menu). By default, it's set to 1. (ex: 0 or 1)
enableAIEmbed (optional) = Allowing the user to perform an AI Search on the DAM library. By default, it's set to 0. (ex: 0 or 1)
Attention: This option, once activated, will allow users to run AI searches in the library. It is available on the assumption that a Visual AI package is part of your subscription and that you have previously activated image embedding on your library and for uploads, and that you have enough AI credits to run some specific AI requests (eg. find similar). Please contact your administrator and our support team if you are unsure.
1
Add Assets
1/ Click Add Assets 2/ Asset picker modal: Choose any asset(s) you want to insert 3/ On top of the modal: Click Insert 4/ Result
2
Reorder
Drag and drop to sort assets
3
Remove Asset
On each added Asset -> Click the Bin icon to remove one Item
4
Remove all Assets
To remove (delete) all Assets, click the red "Remove all assets" in the top right corner.


Fit: Keep all content in image, and make image fit the size
Addition subfix URL: append a suffix to asset URLs to enable transformations, read more here: Transformations
Please click "Save changes" to update the configuration
Third try: Type: Global / Scope: commerce / Locale: en_US
Use size and image resize technique from Default configuration above
Product
Choose family, we can choose "All items", this will be affected all Families in selected type
Scope and locale
Product / Product Code
Product code metadata identifies the specific products to be updated during the synchronization process. Use a text field. If you use Product reference instead Metadata. Please first Enable Product in DAM / Library / Feature Components
Text
Product / Product model code
Product model code metadata identifies the specific products to be updated during the synchronization process. Use a text field.
Text
Asset / Family
Asset family attributes must be synchronized between DAM and PIM, using a select-one field with identical predefined options in both systems.
You can use "Sync family options" to add all families from PIM to DAM Metadata field options.
Select one
Asset/Default PIM Asset Attribute
This is the default attribute to which assets will sync if no specific setting is defined in the Asset Attribute Mapping.
N/A
Asset / Asset Code
Asset code metadata identifies the specific products to be updated during the synchronization process. Use a text field. To get all options family from PIM you can use Sync family option feature, read bellow.
Text
Click save
Value per locale is true, value per channel is false: Must choose at least one locale
Value per locale is false, value per channel is true: Must choose at least one scope
Value per channel and value per locale are both true: Must choose at least one scope and locale
No Scope + No Locale
Value per locale: False
Value per channel: False
Scope + No Locale
Value per locale: False
Value per channel: True
No Scope + Locale
Value per locale: True
Value per channel: False
Scope + Locale
Value per locale: True
Value per channel: True
Scope
Asset metadata scope/channel attributes must be synchronized between DAM and PIM, using a multi-select field with identical predefined options in both systems. You can use "Sync scope options" to add all scopes/channels from PIM to DAM Metadata field options
Multiple select
Locale
Asset metadata locale attributes must be synchronized between DAM and PIM, using a multi-select field with identical predefined options in both systems. You can use "Sync locale options" to add all locale from PIM to DAM Metadata field options
Multiple select
Product /Family
Product family attributes must be synchronized between DAM and PIM, using a select-one field with identical predefined options in both systems. To get all options family from PIM you can use Sync family option feature, read bellow. You can use "Sync family options" to add all families from PIM to DAM Metadata field options.
Select one
Product/Default PIM Product Attribute
This is the default attribute to which assets will sync if no specific setting is defined in the Product Attribute Mapping.


N/A
Then you will be redirect to this page, please add a Role and Group to this Data source
Save these information to use in next step
Fit: Keep all content in image, and make image fit the size
Addition subfix URL: append a suffix to asset URLs to enable transformations, read more here: Transformations
Please click "Save" to update the configuration
Third try: Type: Global / Scope: commerce / Locale: en_US
Use size and image resize technique from Default configuration above
Product
Choose family, we can choose "All items", this will be affected all Families in selected type
Scope and locale
Product / Product Code
Product code metadata identifies the specific products to be updated during the synchronization process. Use a text field. If you use Product reference instead Metadata. Please first Enable Product in DAM / Library / Feature Components
Text
Product / Product model code
Product model code metadata identifies the specific products to be updated during the synchronization process. Use a text field.
Text
Click save
Value per locale is true, value per channel is false: Must choose at least one locale
Value per locale is false, value per channel is true: Must choose at least one scope
Value per channel and value per locale are both true: Must choose at least one scope and locale
No Scope + No Locale
Value per locale: False
Value per channel: False
Scope + No Locale
Value per locale: False
Value per channel: True
No Scope + Locale
Value per locale: True
Value per channel: False
Scope + Locale
Value per locale: True
Value per channel: True
Scope
Asset metadata scope/channel attributes must be synchronized between DAM and PIM, using a multi-select field with identical predefined options in both systems. You can use "Sync scope options" to add all scopes/channels from PIM to DAM Metadata field options
Multiple select
Locale
Asset metadata locale attributes must be synchronized between DAM and PIM, using a multi-select field with identical predefined options in both systems. You can use "Sync locale options" to add all locale from PIM to DAM Metadata field options
Multiple select
Product /Family
Product family attributes must be synchronized between DAM and PIM, using a select-one field with identical predefined options in both systems. To get all options family from PIM you can use Sync family option feature, read bellow. You can use "Sync family options" to add all families from PIM to DAM Metadata field options.
Select one
Product/Default PIM Product Attribute
This is the default attribute to which assets will sync if no specific setting is defined in the Product Attribute Mapping.


N/A


[
{
"uuid": "2a9de85c-406a-5101-9ab5-7b6259250001",
"name": "$R202RV2-AiiacoEg.jpg",
"cdn": "https://try.filerobot.com/Widget_demo_folder/%24R202RV2-AiiacoEg.jpg",
"extension": "jpg",
"source": "filerobot",
"type": "image/jpeg"
},
{
"uuid": "c83ca796-00e5-5c08-b87c-cd6ecee50000",
"name": "012871.tif",
"cdn": "https://try.filerobot.com/Widget_demo_folder/012871.tif",
"extension": "tif",
"source": "filerobot",
"type": "image/tiff"
}
][
{
"uuid": "2a9de85c-406a-5101-9ab5-7b6259250002_0",
"name": "$R202RV2-AiiacoEg.jpg",
"cdn": "https://try.filerobot.com/Widget_demo_folder/%24R202RV2-AiiacoEg.jpg",
"extension": "jpg",
"source": "filerobot",
"type": "image/jpeg",
"attributes": {
"meta": {
"boolean": null,
"date": "",
"description": {
"en": "neweded"
},
"malt_id": "",
"multi_select": null,
"number": "",
"price": {
"default": "12"
},
"product_id": {},
"sales_tags": {},
"select_one": null,
"shouldbedeleted": "",
"sku": "",
"sport": "",
"test": "",
"test-multi-select": null,
"test-price": {},
"title": {
"en": "testssssss"
}
},
"tags": {}
}
},
{
"uuid": "c83ca796-00e5-5c08-b87c-cd6ecee50000_1",
"name": "012871.tif",
"cdn": "https://try.filerobot.com/Widget_demo_folder/012871.tif",
"extension": "tif",
"source": "filerobot",
"type": "image/tiff",
"attributes": {
"meta": {
"boolean": null,
"date": null,
"description": {
"en": "s"
},
"malt_id": null,
"multi_select": null,
"number": null,
"price": {
"default": "2000"
},
"product_id": {
"default": "HJUUIISS"
},
"sales_tags": {
"default": [
"best",
"hot"
]
},
"select_one": null,
"shouldbedeleted": null,
"sku": "ddss-2",
"sport": null,
"test": null,
"test-multi-select": null,
"test-price": {},
"title": {
"en": "đ"
}
},
"tags": {
"en": [
{
"label": "test",
"sid": "#tgb84ea"
},
{
"label": "tags",
"sid": "#tgc4915"
}
],
"fr": [
{
"label": "~ test",
"sid": "#tgb84ea"
},
{
"label": "~ tags",
"sid": "#tgc4915"
}
],
"ru": [
{
"label": "~ test",
"sid": "#tgb84ea"
},
{
"label": "~ tags",
"sid": "#tgc4915"
}
]
}
}
}
]